Caliper Analysis
After specifying the input data, you can now run the caliper analysis to calculate the breakout positions. JewelSuite Geomechanics uses default filter parameters during the analysis. A feature is only classified as a breakout if it meets all the requirements set as filter parameters. You can adjust the values for these parameters on the BO Filter Criteria form.
Specify Input Data
Upon opening the form, the Study interval MD min and max is already filled in, based on the depth interval where you have caliper data available. If you do not want to do the caliper analysis on the complete depth interval, but on a user defined section, you can enter new MD values yourself. You can change the MD back to the caliper log range by clicking on the Reset button ![]() .
.
Run Analysis
Click (Re)Calculate to start the analysis. The first time you run the analysis, the lock is red, see below for the different colors of the lock and its implication.
|
|
Open When the lock is green and in the open position, the associated algorithm is automatically executed when a change is made to the data’s input. Current status of output data is 'up-to-date'. |
|
|
Locked, No Changes When the lock is blue and in the locked position, the associated algorithm is not updated when a change is made to the data’s input. Current status of output data is 'up-to-date'. |
|
|
Open, Red When the lock is red and in the open position, the associated algorithm is automatically executed when a change is made to the data's input. Current status of output data is 'not-up-to-date', meaning the algorithm was already executed but output data was not calculated/updated due to some errors or lack of input data. |
|
|
Locked, Red When the lock is red and in the locked position, the associated algorithm is not updated when a change is made to the data's input. Current status of output data is 'not-up-to-date'. To apply the updates, you need to click the associated (Re)Calculation button. |
After the analysis, all the created logs are available in the JewelExplorer. One of the logs that is created is the 'Wellbore Elongation 3D' log. This is an array log, meaning it can have multiple values at the same depth. You can use this image log to display the actual geometry of the wellbore, as determined by the caliper tool measurements and calculated breakout position.
Click Show to open a Well View with a dedicated caliper template.
Click Show on 3D View to open a dedicated 3D View with the wellbore and the Wellbore Elongation 3D log selected, using 3D Log and Show Shape as display settings to show the geometry of the wellbore.
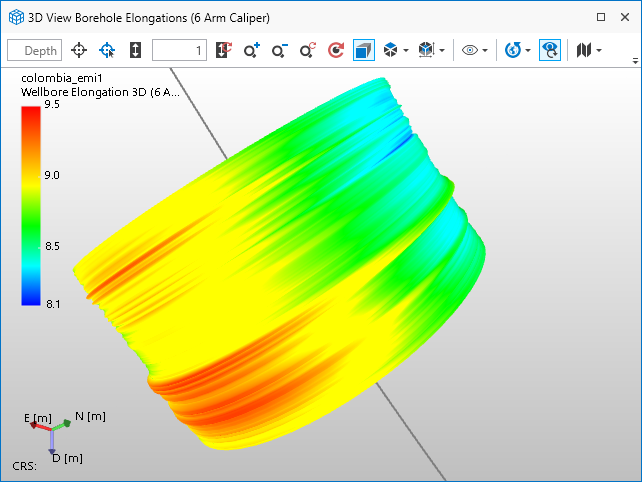
Dedicated 3D View opened from the Caliper Analysis form. The wellbore and the log Wellbore Elongation 3D are displayed. click to enlarge