Editing Tools
The editing tools consist of a floating palette with various tools. To display the floating palette, go to Workspace > Tools > Editing Tools on the right of the Strip or press Shift+F1.
You can use the editing tools on all surface representations - point sets, polyline sets, 2D grids and tri-meshes - as well as on 3D grids and 3D meshes. There are also tools you can use for graphically editing wells - including well pads, wellbores, well designs, targets and markers.
Other uses for the editing tools include creating or adjusting seismic interpretations - creating faults and horizons or just tweaking fault sticks for example - and creating boundaries. For polyline sets and point sets you can create data by adding nodes not only on an object but also in empty space around a displayed object or in a completely empty view.
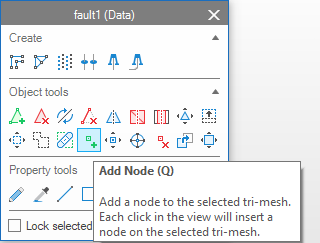
The graphical editing tools are available on the floating palette click to enlarge
The Title Bar shows your currently selected (or active) object.
The Create section always appears on the palette and allows you to create new objects (such as a new polyline set or a well). The set of create tools that is available to you depends on the active view. E.g., the create tools that require points in 3D space are not available when the 2D View is your active view, since the 2D View is a 3D View without z values.
The Object Tools section includes all the tools for changing the geometry of the object you have selected (adding or deleting a triangle for a tri-mesh, for example).
The Property Tools section includes all the tools for changing the properties of the object you have selected (graphically painting a new facies property on a 3D grid, for example).
The Object Tools and Property Tools sections are also context-sensitive and show only the tools relevant to the object type you have selected.
The Settings section shows any additional settings for the tool you have selected (e.g. a distance setting for the Cut Triangles Under Line tri-mesh tool). This section appears only for tools where you can specify additional settings.
The Lock selected object checkbox is unchecked by default. When checked, this option ensures that the tools do not change when you click an object of a different type, so you can continue to work on the object you selected.
Although you use the various tools in different ways, you invoke them all in the same way.
To start using a graphical editing tool:
- If not already visible, show the floating palette by selecting Tools > Editing Tools in the Workspace section on the right of the Strip.
-
Ensure that the object you want to edit is visible in your view.
-
Select the object by clicking on it either in your view or in the JewelExplorer.
You can check you have selected the object you intended by looking at the title bar of the floating palette. This displays the name of the object and its type. - The floating palette displays the tools relevant to the object you have selected. Select the tool you wish to use in the floating palette. The background of the selected tool will become blue, and the icon of the selected tool will be visible next to the mouse arrow.
- Adjust the options in the Settings section of the palette (if any).
- Work on the object in your 3D View, Cross Section View, Well View, Seismic View or any other view that is currently active and displaying the object.
- To stop working with a tool, click on the icon in the floating palette once more, or press Esc.
Hover over a tool to view an explanation of what it is and how to use it along with keyboard shortcuts and combinations for special editing options.
- Open the floating palette by selecting Tools > Editing Tools in the Workspace section on the right of the Strip.
-
In the Create section of the floating palette, select the tool you want to use by clicking on one of the tool icons e.g. 'Add polyline set'. This creates an empty surface representation in the JewelExplorer.
-
To create data select in the Tools section of the floating palette the 'Add' icon, e.g. 'Add Polyline'.
-
Optionally, adjust the options in the Settings section of the palette.
- Click in an empty view or in empty space around a displayed object to create new data.
- To stop working with a tool, click on the icon in the floating palette once more, or press Esc.
For detailed explanations on how to use the various tools for specific object types, see
Graphically editing point sets
Graphically editing tri-meshes
Graphically editing properties
Graphically editing log annotations
Undo and redo
When working with the tools, if you decide you would rather not have done something, you can undo this using the Undo button in the Strip. You can also redo actions you have undone with the Redo button.
The default number of actions you can undo is five, but you can change this on the Home > Settings > Options > General form.