Adding and editing log annotations
You can add and/or edit log annotations for any log and display them in the Well View. Log annotations are added to a specific well, at a given depth and value for the log, but you can change this manually. In addition, log annotations can be customized by changing the font and font color, background color, border color and thickness using the options available under the Display Settings tab.
Annotations are added to a log that is displayed in the Well View by selecting the Annotations > Add... option from the context menu of the log or the track. This will open the Add Annotation form, which allows you to type in the text for the annotation and specify the formatting. By default, annotations are represented in the Well View track as an anchor, a small triangle symbol, which is added to the log at the point which was right-clicked to open the log context menu. This point is displayed as a red dot. The anchor position can be changed using the settings available under the Position Tab.
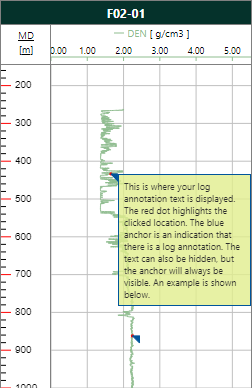
Log annotations visualized in a Well View. click to enlarge
Adding an annotation
- Upon opening the form, the wellbore and the log are preselected. If you have multiple logs visualized in the same track, you can also select one of the other logs.
- In the Annotation text field, enter the text that is required.
- Keep the current settings under the Position tab, or adjust if necessary:
- Keep the current settings under the Display Settings tab, or adjust if needed:
- Click Apply to save the settings, create the annotation and keep the form open, or click OK to save the settings, create the annotation and close the form.
Wellbore A read-only field that displays the wellbore that the log annotation will be attached to.
Log The specific log which the annotation will be attached to is selected in this drop-down list. Only those logs that are displayed in the particular track are available for selection. If only one log is displayed in the track, it is selected by default.
Depth scale Upon opening the form, the depth scale that is used in the Well View is selected. If you want, you can change the depth scale to one of the other options available. Select from MD, TVDSS or TVD.
Depth position Upon opening the form, the depth where you clicked to open the context menu is listed. You can change this value if needed. Alternatively, you can move the position of the log annotation with the Move Annotation tool on the floating palette (Workspace > Tools > Editing Tools).
Horizontal position Upon opening the form, the (selected log) value of the clicked location to open the context menu is listed. You can change this value manually by typing any other value or you can use the Set to current log value button. This will change the value to the log value at the selected depth. Alternatively, you can move the position of the log annotation with the Move Annotation tool on the floating palette (Workspace > Tools > Editing Tools).
Position relative to anchor This option determines the location of the log annotation in the track. Upon opening the form, the Auto option is preselected. If you select Left, the log annotation is placed to the left of the anchor. If you select Right, the log annotation is placed to the right of the anchor.
Font The font type of the text that is displayed in the log annotation. To change the font, click the ellipsis button  and on the dialog that opens, select the font of your choice. You can also change the font style and font size if needed.
Font color The color of the annotation text. To change the color, use the drop-down to open a color selection window where you can select any color you want.
Background Select whether or not you want a background color for the annotation. The default selection is On.
Background color The color used for the background. To change the color, use the drop-down to open a color selection window where you can select any color you want.
Border Select whether or not you want a border around the annotation. The default selection is On.
Border color The color used for the border. To change the color, use the drop-down to open a color selection window where you can select any color you want.
Border thickness The line thickness for the border. To change the border thickness, type in any other value.