Creating and editing constraints
The floating palette (Workspace > Tools > Editing Tools at the right of the Strip) contains the tools to create and edit constraints that can be used to interpolate your thickness map or facies trend map.
To create a constraint:
- Visualize the map that you want add/edit constraints for
- Maps > Facies Trend Maps > Your Facies Trend Map > Facies Class > 2D Grid or Property
- Maps > Thickness Maps > Your Thickness Map > 2D Grid or Property
- The Thickness Maps workflow (prepare > Thickness Map > Thickness Maps)
- The Facies Trend Maps workflow (model > Facies > Facies Trend Maps)
- Open the floating palette via clicking one of the following:
- Workspace > Tools > Editing Tools (Shift + F1)
- Open Editing Tools button
 on the Constraints tab on the Interpolate Map form
 - Select one of the tools depending on the type of constraint you want to create:
- Click on the map at the location(s) where you want to add a constraint.
- When you are done click on the Add Node
 tool, or the Extend Constraint
  tool to deactivate the tool.
 - The constraints are stored in the JewelExplorer under the selected map you are working with.
- A constraint entry is created on the Constraints tab on the Interpolate Map form. Type in a value in the table that will be used for that constraint (for a single node, or along a polyline or within the area of a patch). Every constraint can only have a single value.
- Click OK or Apply on the Interpolate Map form to interpolate the map using the constraint(s). All constraints that are checked on the form are used.
Open the map in a 2D View Maps are stored in the following folders in the JewelExplorer:
Open the dedicated Thickness/Trend Map You can open the dedicated Thickness/Trend Map via opening one of the forms in the workflows:
The editing tools for the constraints are distributed in two sections. The 'Create' section allows you to create new constraints. The 'Constraint Tools' section allows you to further edit your constraints such as by adding, moving or removing nodes.
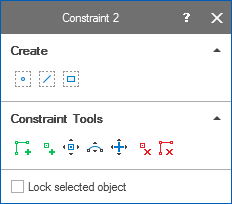
The editing tools for the constraints. click to enlarge

|
Create Node Constraint Create a constraint that consists of a single node. |

|
Create Polyline Constraint Create a constraint that consists of a polyline. |

|
Create Patch Constraint Create a patch constraint. |
When you select one of the tools the Add Node tool, or the Extend Constraint tool is activated.
To edit a constraint:
You can use the constraint tools to further edit your constraints. In order to edit your constraints you must first activate the constraint you want to edit by selecting it in the JewelExplorer. Active constraints are shown on the map with orange nodes.
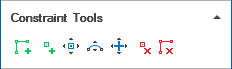
The constraint tools on the floating tools palette click to enlarge
You can adjust the display settings of the constraints, e.g. node size or font color, on the Display settings form (home > Settings > Display Settings > Objects > 2D Maps > Constraints).
|
|
Extend Constraint (Shortcut key: Ctrl+W) Extend the selected constraint. Click at the location where you want to add a new node. |
|
|
Add Node (Shortcut key: Q) Add a node to the constraint. Click at the location on the constraint where you want to add the node. |

|
Move Node (Shortcut key: M) Select the constraint. Click on the node you want to move. Hold down the Ctrl key and drag the node to its desired location. Alternatively, hold down the Shift key and click on two nodes to select a contiguous set of nodes. Then use Ctrl and click and drag to move the selected nodes. |
|
|
Move Nodes Along Curve (Shortcut key: Ctrl+M) Hold down the Shift key and click on three or more nodes to select them. Then hold down the Ctrl key and drag a node. Adjacent nodes will move along a curve based on spline interpolation in between the end nodes to create a smooth path on your thickness map. |

|
Move Polyline/Patch (Shortcut key: R) Select the constraint. Hold down the Ctrl key and drag the constraint to its desired location. |

|
Remove Node (Shortcut key: Ctrl+Q) Select the constraint. Click on the node you want to remove. |
|
|
Remove Polyline/Patch (Shortcut key: X) Select the tool, click on the constraint you want to remove. |