Visualizing seismic data in the Seismic View
The Seismic View (Workspace > Views > Seismic View, or Alt+F3) is a 2D view in which you can QC and validate surface interpretations against a seismic backdrop of any horizontal or vertical orientation, QC structural modeling results (such as fault-fault and horizon-fault intersections) or check the seismic-to-well ties of trajectory data, markers or logs. This view supports both time and depth domain. The backdrop seismic data determines the domain of the Seismic View.
To display seismic data in the Seismic View, you need a seismic section and a seismic attribute. The seismic section can be
- a standard seismic section (Inline, Crossline, Depth/Timeslice)
- a random section of the type Vertical Section or Plane Section (when it is vertical)
When opening a Seismic View, the view will initially be blank. When you select a seismic line in the JewelExplorer, the seismic attribute is checked automatically, and you can view your seismic data. Note that by default the 'original' seismic attribute is displayed when you opt for a standard seismic section. To visualize seismic data on a random section, see Visualizing your seismic data on a random line.
By default JewelSuite creates one instance of standard seismic sections (Inline, Crossline, Depth/Timeslice) upon importing a seismic volume. If you want to create multiple Inlines, Crosslines or Depth/Timeslices under the seismic volume, open the seismic volume's context menu in the JewelExplorer, and select Create Inline, Create Crossline or Create Depthslice see image below.
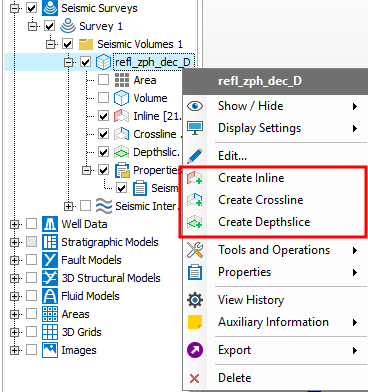
Use the Create options in the seismic volume's context menu to create additional seismic sections click to enlarge
Each Seismic View can only display one section at a time. You can open multiple Seismic Views however, and display a different section in each view. The name of the Seismic View is interactive and will reflect the type and index number of the seismic section that is selected (see image below).
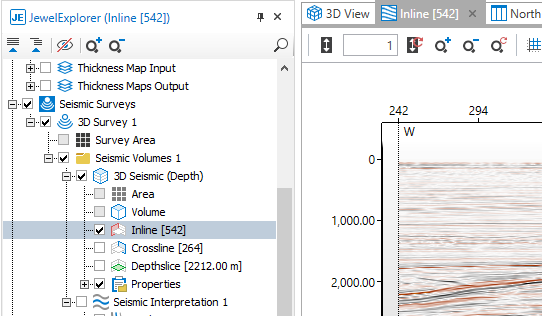
Viewing Inline [542] in the Seismic View. The name of the Seismic View reflects the selected seismic section in the JewelExplorer click to enlarge

There are various ways you can move through the sections in the Seismic View:
- Sliders - Select a section in the JewelExplorer and open the Object Inspector
 . Under Section control , you can drag the slider for an arbitrary index change or click the backward / forward buttons next to the sliders to move your section for the selected increment. Increment 1 means moving the seismic section to the next 'available' index in your data.
 - Keyboard arrows - Move through the sections by clicking the view to select it, and use the forward and backward arrows on your keyboard. Note that slider and arrow keys use the same increment specified in the Object Inspector.
- 3D View - by moving sections in the 3D View (press Shift on your keyboard, then click and drag a section), and seeing the update in the Seismic View.
 , and reviewing the value under the Slider trackbar section.
Upon importing seismic data, JewelSuite transforms the original SEGY data format into a proprietary bricked data format to optimize the data retrieval. For an optimized seismic data rendering (in 2D and 3D), JewelSuite renders the bricked data sequentially and adds details in three different steps: low resolution, medium resolution and high resolution. The size of your seismic data determines the rendering lag time between these three stages (when displaying seismic data for the first time, or moving a seismic section).
With the following options under 'Objects > Seismic volumes' on the Display Settings form (home > Settings > Options) you can reduce the time it takes to load the seismic data:
Only use high resolution data Use this option when the size of your seismic data is small.
Skip low resolution usage when high res data is loaded already This option is selected by default. If you have seismic data in you cache memory, this data will be used. If you want to go trough your slices fast, uncheck this option.
Allow all traces in memory No threshold is applied for storing seismic data in cache memory while investigating/browsing your seismic data in 3D and seismic views. This is recommended if available memory on your machine is higher than the size of active seismic volumes you are going to work with.
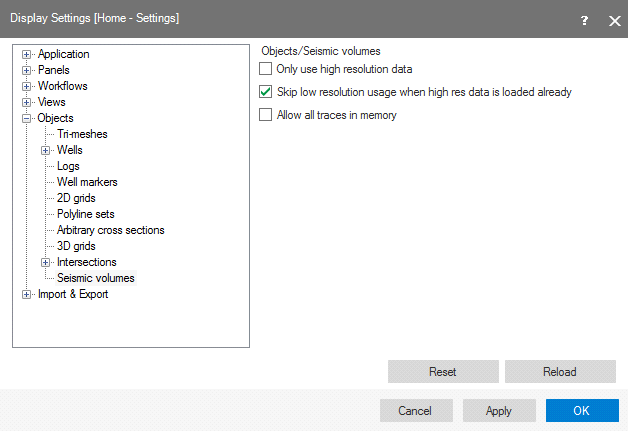
Use the Display Settings to reduce rendering time for your Seismic View click to enlarge
The settings on the Display Settings form (home > Settings > Display Settings, under Views > Seismic view) allow you to configure the default settings for Seismic Views. These settings only take effect on newly opened Seismic Views (not on views that are already open).
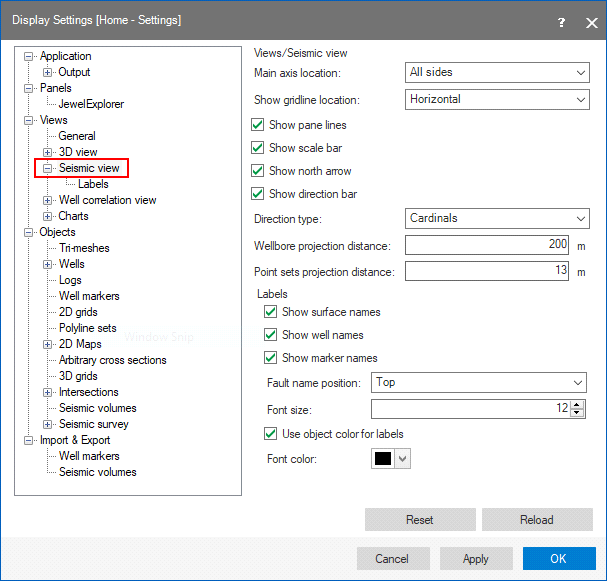
Use the Display Settings to change the default settings for the Seismic View. click to enlarge
The following options are available on the form:
Main axis location Choose one of the options to configure the location of the horizontal and vertical axes, respectively.
Show gridline location Choose whether you want to display gridlines on the Seismic View (Horizontal and Vertical, only Horizontal, only Vertical, or None).
Show pane lines For a cross section that has more than one pane, the pane line or inflection point can be displayed on the Seismic View as a vertical line (see image above).
Show scale bar Select to display a scale bar.
Show north arrow Select to display a north arrow. North arrows can only be displayed on Depth/Timeslices.
Show direction bar When you check the box, the selected 'Direction type' will be displayed (see 'Direction type' below).
Direction type Select to display the direction in degrees or cardinals (e.g. N, NNE, NE, E, etc). Make sure the 'Show direction bar' checkbox is checked, else no directions are displayed. Directions can only be displayed on Inlines and Crosslines.
Wellbore projection distance Defines the half-width of a 'corridor' around a planar or vertical cross section. Wellbores that are located inside this corridor, will be projected on the Seismic View (or Cross Section View).
When you display wellbores or point set data on a cross section that consists of more than one pane in a Seismic View or a Cross Section View, JewelSuite projects the wellbores and point set data using a non-orthogonal method. An advantage of the non-orthogonal projection is that you will get a consistent cross-section in either view, i.e. objects are projected in the right order, which is less likely to be the case for orthogonal projection.
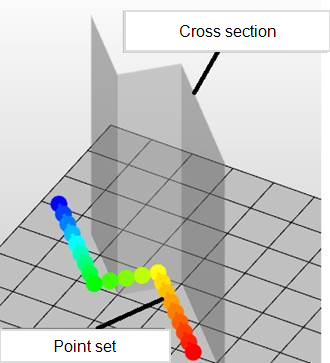
Point set with distance to cross section. When viewing this point set projected on the cross section in the Seismic View or Cross Section View, a non-orthogonal method is used. click to enlarge
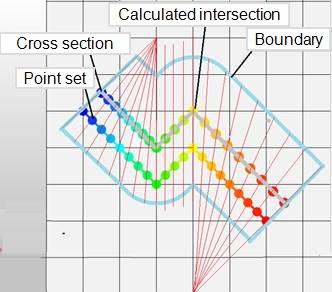
Projection using a non-orthogonal method. This method is chosen to prevent duplication and blind spots around the corners of the cross section panes when displaying wellbore or point set data. click to enlarge
The greater the projection distance, the larger the (possible) distortion of the projected wellbores and point set data, and the higher chance of a mismatch between cross-section backdrop data (e.g. seismic, 3D grid properties) and the projected wellbores and point set data. This effect does not occur when you display wellbores and point set data on a single pane cross section, i.e. a plane section.
Tips for visualizing wellbores and point set data on cross sections
- For single wellbore display, use a wellbore section which follows the wellbore like a curtain. This mitigates the risk of distortion due to projection. To create a wellbore section, you can use the wellbore's context menu Create > Create Wellbore Section or use the Wellbore Section form on the plan strip, see Creating a wellbore section.
-
For multi wellbore or point set cloud display, keep the cross-section pane as close as possible to the wellbore trajectory or point set cloud, and apply a shorter projection distance. You can create the cross section pane graphically using the cross section tool (
 ) in the 3D View. For wellbores you can also create such a connected wellbore section using the cross-section form
 - Use a combination of the 3D View and Cross Section/Seicmic View to be aware of possible projection artifacts.
Point sets projection distance Defines the half-width of a 'corridor' around a planar or vertical cross section. Nodes of a point set that are located inside this corridor, will be projected on the Seismic View (or Cross Section View).
Labels - Applies to surfaces (polyline sets, 2D grids and tri-meshes), wells and markers
Show surface names /well names /marker names Select (check the box) if you want to display the names of surfaces (polyline sets, 2D grids and tri-meshes), wells or markers that you are currently displaying in the Seismic View. For wells, you can distinguish between Well Name Only, or Wellbore Name Only (or both). Be aware that the individual settings of objects overrule these settings, see Displaying object labels in the Seismic View.
Fault name position Show the fault name on the Inline/Crossline at the top or base of the fault.
Font size Choose the font size for all the labels that you select here.
Use object color for labels If you check the checkbox, the labels will have the same color as the objects, i.e. the color used in the JewelExplorer.
Font color Here you define the label color when the 'Use object color for labels' checkbox is unchecked (see above).
Reset / Reload If you made changes to the default settings and clicked Apply or OK, these updated settings are saved on the form. You can revert back to the default settings by clicking Reset. If you want to revert back to previously applied settings, click Reload. Note that after you clicked either Reset or Reload, you need to click Apply or OK to save these settings on the form.
![]() To change display settings for a Seismic View that is already open in your solution
To change display settings for a Seismic View that is already open in your solution
To get access to the display settings of a Seismic View which is already open in your solution, open the Inspector (Workspace > Panes) and select the relevant object (Inline, Crossline, Depth/Timeslice, or, in case of a random section, Plane or Vertical Section) in the JewelExplorer. The display settings are available in the Object Inspector (see image below). The options in the Object Inspector for an arbitrary section are limited to the wellbore projection distance.
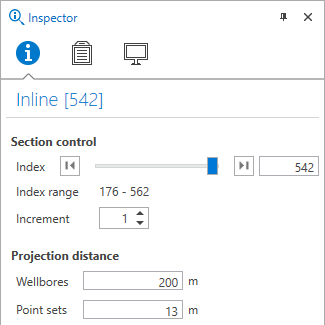
Display options for a standard seismic section in the Seismic View (in this case, Inline [542]) in the Object Inspector. Note that for an arbitrary section in the Seismic View, the Object Inspector is limited to wellbore projection distance click to enlarge
The following options are available on the Object Inspector:
Index Line number for the relevant Inline, Crossline or Depth/timeslice. Use the index control buttons to move through slices.
Index Range Range of available index numbers.
Increment This number defines how many slices are skipped when moving through slices with Index control buttons. An increment of 1 means you will view every slice, an increment of 4 means you only view every fourth slice. The increment is not the same as the stepsize, which you set on the Optimize form (DATA > Seismic > Import > Optimize) and which decimates your data.
Wellbores The maximum distance over which wells will be projected on your Seismic View (or Cross Section View).
of the relevant object (i.e. an Inline, Crossline, Depth/Timeslice or, for arbitrary sections, a Vertical Section or Plane Section) and 3) On the View Inspector  of a Seismic View.
Point sets The maximum distance over which points sets will be projected on your Seismic View (or Cross Section View). Only the nodes that fall within the distance, will be projected.
Right-click Displays the context menu of the selected object. All objects have their own context menu and the options available depend on the active view.
Middle-drag or Left+Right-drag Allows you to pan the view.
Right-drag Right mouse click and hold to zoom in. While dragging, a blue rectangle indicates the area where you zoom in to.
Scroll wheel Allows you to zoom in and out. You can change the ‘mouse wheel forward’ from zoom out to zoom in on the Display Settings form (home > Settings).
Apart from seismic data, you can also select other objects to show in the Seismic View:
- Wellbores
- Logs
- Markers
- Surfaces (from any model)
Wellbores, logs and markers will be projected with the wellbores projection distance. Solid/dashed lines indicate whether a wellbore is in front or in the back of the seismic slice.
Point Sets will be projected using the point sets projection distance.
Other surface types use real intersections for their visualizations and will not use a projection distance.
The projection distance can be changed in the Inspector, when you have the Seismic View open, and a seismic slice selected in the JewelExplorer. You can also use the Display Settings form (home > Settings > Options) to adjust the projection distance, which will work on every new Seismic View that you open.
Displaying object labels in the Seismic View
In the Seismic View, you can display object labels for wells, wellbores, surfaces (polyline sets, 2D grids, tri-meshes) and markers. The locations where where you can control the display settings for these labels are :
- Specify default labeling settings via Display Settings (home > Settings > Display Settings) for each new Seismic View.
- The Property Inspector of a specific object (e.g. a marker, tri-mesh, etc) under the section 'Display Parameters'. Here, under 'Show name(s)' you can select True/False to show or hide the display of the label of each object.
![]() Surface intersection visibility settings in the Seismic View
Surface intersection visibility settings in the Seismic View
You can control the visibility of the surface intersections in the Seismic View using the Inspector and the JewelExplorer. There are three types of intersections you can display:
- Polyline set intersections – these are the intersections of a seismic slice with a polyline set. These intersections will be shown as a line with dots (i.e., an intersection of a seismic slice with a line is a dot).
- Tri-mesh intersections – these are the intersections of a seismic slice with a tri-mesh. These intersections will be shown as lines (i.e., an intersection of a seismic slice with a surface is a line).
- 2D grid intersections - these are the intersections of a seismic slice with a 2D grid. These intersections will be shown as lines.
Use the Property Inspector ( ) to change the display settings, e.g. node size or line thickness, if needed. These new settings are then applied to the selected surfaces in all views.
The toolbar at the top of your Seismic View contains the following set of tools:
 Scale in depth direction Enter a value in the box to the right of the icon to scale vertically for a more detailed view of the different layers.
![]() Reset scale Clear all depth scaling changes to the model and reset the scaling value back to 1.
Reset scale Clear all depth scaling changes to the model and reset the scaling value back to 1.
 Zoom in Zoom in on the view.
 Zoom out Zoom out of the view.
![]() Reset zoom Reset any zoom changes back to the original view.
Reset zoom Reset any zoom changes back to the original view.
![]() Grid Show or hide a grid over your data.
Grid Show or hide a grid over your data.
 Grid annotation Show or hide the vertical and horizontal grid annotation
 Grid margins Show or hide the white margins around the view.
 Flip horizontal Flip the view horizontally.
![]() Show north arrow Show or hide a north arrow. North arrows can only be displayed on Depth/Timeslices.
Show north arrow Show or hide a north arrow. North arrows can only be displayed on Depth/Timeslices.
![]() Show direction bar Show or hide the direction. It depends on the selected 'Direction type' (Seismic View display settings) whether degrees or cardinals (e.g. N, NNE, NE, E, etc.) are shown.
Show direction bar Show or hide the direction. It depends on the selected 'Direction type' (Seismic View display settings) whether degrees or cardinals (e.g. N, NNE, NE, E, etc.) are shown.
![]() Show trace index In the inline and crossline views, change the scale of the depth slice axis from depth to trace index number.
Show trace index In the inline and crossline views, change the scale of the depth slice axis from depth to trace index number.
 Copy view to clipboard Copy the current view to the clipboard for use in other applications.
 Save view to file Save the current view to an image file.
 Probe (shortcut key: Ctrl+I) Select to display information (name of the seismic volume, seismic attribute, northing, easting, TVDSS) at the position of your cursor.
![]() Measurement line Measure the distance between two points. Select the tool and click at two points. The distance between the points, apparent dip and azimuth are shown in the Seismic View. Display the Output Info pane to also view the locations of each point as well as lateral distance and vertical distance.
Measurement line Measure the distance between two points. Select the tool and click at two points. The distance between the points, apparent dip and azimuth are shown in the Seismic View. Display the Output Info pane to also view the locations of each point as well as lateral distance and vertical distance.
![]() Measurement polygon Measure the area of a polygon. Select the tool and click at multiple points in your Seismic View. A line is drawn between the last clicked point and the first clicked point to complete a polygon. The distances between each apex of the polygon are shown in the Seismic View along with the area enclosed by the polygon. The area is displayed as a yellow highlighted surface. Display the Output Info pane to also view the locations of each point as well as the total length of the perimeter.
Measurement polygon Measure the area of a polygon. Select the tool and click at multiple points in your Seismic View. A line is drawn between the last clicked point and the first clicked point to complete a polygon. The distances between each apex of the polygon are shown in the Seismic View along with the area enclosed by the polygon. The area is displayed as a yellow highlighted surface. Display the Output Info pane to also view the locations of each point as well as the total length of the perimeter.
![]() View linking Various options to link multiple views. See View linking options for more info.
View linking Various options to link multiple views. See View linking options for more info.
![]() Link visibility Show/hide objects simultaneously in all linked views .
Link visibility Show/hide objects simultaneously in all linked views .
![]() Link cursor See the movement of your mouse cursor in all linked views.
Link cursor See the movement of your mouse cursor in all linked views.
![]() Unlink all views Disable all the view linking options for all linked views at once.
Unlink all views Disable all the view linking options for all linked views at once.
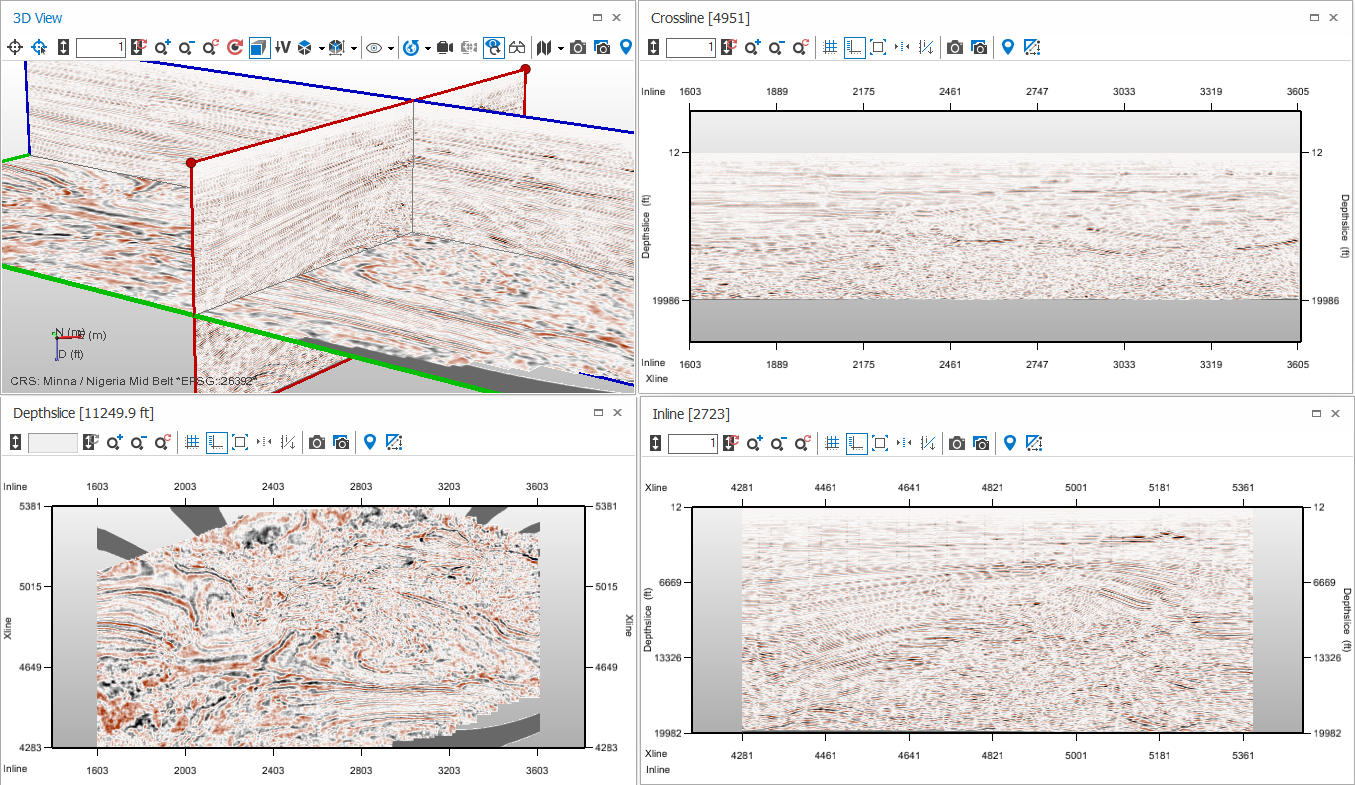
Reviewing seismic data by displaying three Seismic Views and a 3D View simultaneously click to enlarge
For a comprehensive view of your seismic data, you can set up your viewing area to show all three slice views along with a 3D View. Then, when you make changes in slices in any of the views, such as moving a seismic slice, the other views update to reflect this.
View linking options, and especially the cursor linking, can help you better visualize, understand, analyze and compare your data. The cursor linking can be used for 2D views, 3D views, 2D time views, 3D time views, seismic views and a mix of these view types.
Apart from the visibility linking, the seismic views are automatically linked to the 3D view regarding slice movement and ranges.
To set up these four views, display a 3D View, and check, in the JewelExplorer, all three slices (Inline, Crossline and Depthslice). Then open three Seismic Views, and select for each of them a different slice (Inline, Crossline, Depthslice). Then make all the views floating views, either by double clicking on the title bar of the view, or by selecting Float from the context menu of the view Tab, and position the views next to each other as you wish to see them.