Activating fluid zones
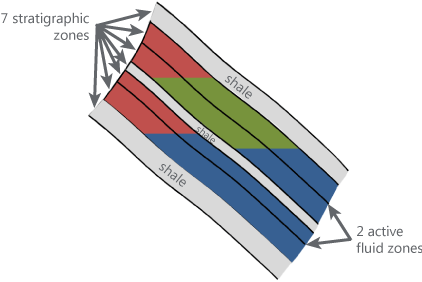
The fluid model in this example has two active fluid zones. click to enlarge
On the Activate Fluid Zones form (model > Fluids) you select which zones you want to take forward in the Fluid Modeling workflow. The zones on this form are based on the boundaries assigned on the previous form, Assign Boundaries. Zones that you leave out of selection on the form will be excluded from the fluid model and will consequently not be available for volumetric calculations where you use the fluid model as an input.
To select active fluid zones for fluid modeling
- On the Activate Fluid Zones form, use the drop-down list to select the fluid model of interest.
-
In the 'Active Fluid Zones' table, select the fluid zones which need to be included in the subsequent fluid modeling steps. You can provide a name for each fluid zone, or leave the name as is.
Selection column When you open the form for the first time, by default all fluid zones listed in the table are selected. Uncheck the box for each fluid zone that you do not want to consider when executing the create compartments operation. Check the box at the top of the column to select or deselect all zones at once.
Name Displays the name of the fluid zone, which can be edited by double-clicking. The default name is given in the following convention: Top Surface_Base Surface
Top Surface Displays the name of the top surface of the fluid zone, this information is read-only.
Base Surface Displays the name of the base surface of the fluid zone, this information is read-only.
- Fluid Model Resolution (only for fluid models based on a structural model) Unfaulted compartment boundaries can be influenced by the resolution of the fluid model compartments. With the drop-down set to 'Medium' (default and recommended setting), the fluid model resolution will be similar to the resolution of the structural model assigned to the fluid model as defined on the model > 3D Structure > Set Modeling Parameters form. In case you have unfaulted compartment boundaries (e.g. when a fault ends halfway a compartment), selecting 'High' (which makes the fluid model resolution twice as fine) can improve such potentially rugged compartment edges. Resolution 'Low' makes the fluid model resolution twice as coarse compared to the structural model resolution, should be used with care and is for performance improvement only. Before you select any other resolution than 'Medium', note that it is strongly recommended to keep/bring the fluid model resolution in sync with the 'target grid' resolution (i.e. the 3D grid to which you will ultimately map the fluid model properties).
- Click OK to move to the next step of Creating compartments. You can also click Apply to save your settings and keep the Activate Fluid Zones form open.