Cleaning the input data
The Clean Up Data step of the Interpolate Property workflow (prepare > Surfaces > Interpolate Property > Clean Up Data) is an optional step. Data clean-up means you can appoint areas/parts of your input data that you want to ignore during property interpolation. For example parts of a tri-mesh with poor data quality or some markers of a marker set you do not trust. Instead of deleting this data, you make use of a special property called 'active property' in which unwanted data is set to 'inactive'. Per input representation, you can create such property. By making use of a property, the original input data is preserved and any previously performed clean-ups can easily be updated or reversed. Also you can create an interpolated output property with varying clean-ups to compare.
Except for markers, data clean-up is performed in a dedicated 'Property Clean-Up View', which automatically opens when you select a representation on the Clean Up Data form. In the view, with the 'active property' selected, you set parts of the representation to 'inactive' with the Editing Tools > Property Tools. To set markers as inactive you use the Marker Table, as this cannot be done in the Clean-Up View.
When you open the Clean Up Data form, you see a table showing the representations assigned to the property definition, checkboxes in front and behind these representations and two tools above the table (initially grayed-out). Below follow some general remarks on the behaviors of the form:
- The checkbox in front of a representation in the table has two functions:
- To specify the representations for which you want to create the 'active property': Check the box(es) of the representation(s) for which you want to create the 'active property' (the Clean-Up View opens). Then click the 'Create property' icon (Image 1 below). A green checkmark in the last column of the table indicates that the 'active property' has been created (Image 2 below). You can find the property under the respective representation in the JewelExplorer, carrying the name 'property name_Active_property definition name'. For markers, the active property is stored under Well Data > Marker Set > the respective marker.
- To specify which 'active properties' you want to use during property creation: When you click Apply/OK at the base of the form, 'active properties' will be used (during property creation) only for the objects that have their boxes checked. 'Active properties' of unchecked representations will be ignored during property creation meaning all the data of those representations is considered input. This allows for easy comparisons of output surfaces with and without 'inactive data'.
- The checkboxes in the representations column are for information only, and indicate which representation (polyline set, 2D grid, tri-mesh, point set and marker) is present for the event.
- An existing 'active property' cannot be overwritten. To re-generate the 'active property' for a representation that already has one, you first have to delete the existing 'active property' from the JewelExplorer.
- At any moment the Property Clean-Up View can be opened by selecting a representation (or checking its checkbox) in the table on the form.
- You can open the Editing Tools > Property Tools in two ways: either by checking the checkbox in front of a representation and subsequently clicking the 'Open editing tools' icon
 at the top of the table, or via Workspace > Tools > Editing Tools. Before you start editing, verify that the name of the representation you want to edit is displayed at the top of the editing tools floating palette, if not, click on the representation in the view, table or JewelExplorer. For general info on the editing tools, see Editing Tools. For how to edit a property with the Property Tools, see Graphically editing properties.
 - Setting markers to inactive is done in the Marker Table (Workspace > Views > Marker Table), not in the Property Clean-Up View.

Image 1 - To create an 'active property', check the box of a representation and click the 'Create property' icon at the top of the table. The name(s) of the property/ies that will be created are shown in the tooltip. click to enlarge
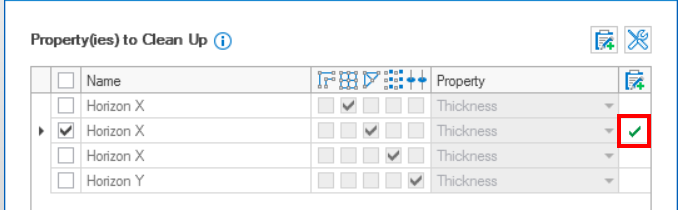
Image 2 - A green checkmark in the last column indicates the 'active property' has been created and is ready for editing. click to enlarge
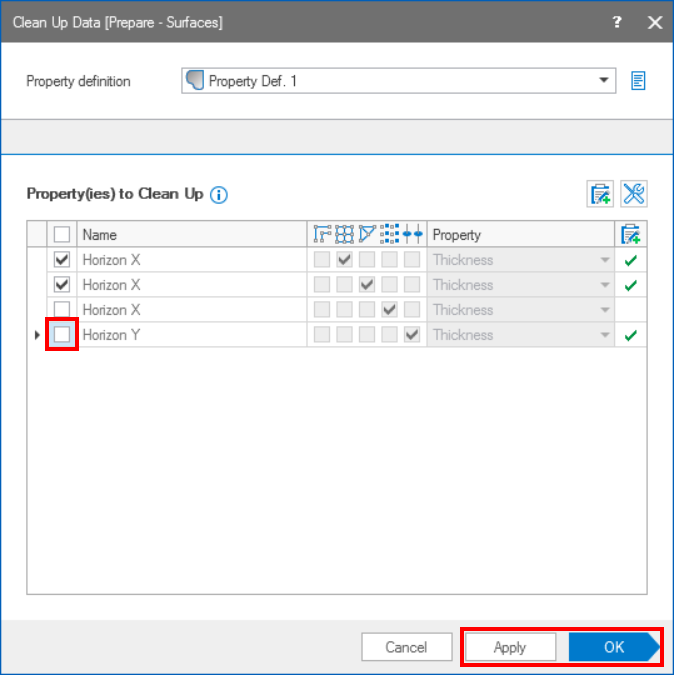
Image 3 - To actually use an 'active property' during interpolation, the checkbox of the corresponding representation must be checked upon Apply/OK of the form. In the example above, Horizon Y has an 'active property' but when its checkbox is not checked upon Apply/OK, the property will be ignored during property creation (all data in the representation will be used as input). click to enlarge
- Open the Clean Up Data form.
- Select the property definition from the Property definition drop-down list. The table on the form will show all representations that were assigned in the previous workflow step.
- Check the checkbox(es) for the representation(s) you want to clean up, then click the 'Create property' icon
 at the top of the table. A pop-up appears with the question whether you want to generate the 'active properties'. Click 'Yes' to the question:
 - A green checkmark in the table behind a representation indicates that the 'active property' has been generated.
- The JewelExplorer has expanded for each of the checked representations.
- The Property Clean-Up View displays the (last checked) representation and updates with each new selection. You can also display multiple representations at the same time in the Property Clean-Up View by selecting multiple representations in the table on the form (hold down Ctrl key + select).
- Make sure the checkbox in front of the representation you want to edit is (still) checked (this enables the Editing Tools icon above the table), select the representation in the table (click on its name, it turns blue) and click the 'Open editing tools' icon at the top of the table. The editing tools floating palette opens for the selected representation (verify the name at the top of the palette, see image below).
- Click on a tool in the Property Tools section on the palette. This opens the Settings section where the 'active property' is auto-selected (if not, you can select it from the drop-down on the palette).
- You are now ready to start editing the representation in the Property Clean-Up View, i.e. setting nodes/areas to inactive. For details on how to do this, see Graphically editing properties.
-
(This step assumes the 'active property' for the marker has been created, see step 3 above.)
Open the Marker Table (Workspace > Views > Marker Table) which is initially empty. In the JewelExplorer, under Well Data > Wells, check the checkbox of subsequently the well and the marker to fill the columns of the Marker Table with the associated data.
-
Look for the column containing the name of the active property (i.e. 'your property_Active_your property definition'). The current state of the marker is 'Active'. Set it to 'Inactive' and close the table. You can verify that the marker is inactive by displaying it in the Property Clean-Up View. To do this, select the Marker Set representation it in the table on the Clean Up Data form (in the view, the inactive marker will be displayed in gray). For general info on the marker table, see Marker Table.
- When you have finished editing the 'active properties', check the checkboxes of the representations for which you want to use the 'active properties' during property creation. When the checkbox of a representation with an 'active property' is not checked, the 'active property' will not be used during creation of the property and all the input data points of the representation will be used as input, see image 3 under 'Tips and tricks' above.
- Click Apply or OK at the base of the form to move to the next workflow step Define Interpolation
To generate the 'active property'
To edit the 'active property' (for markers, see step 7)
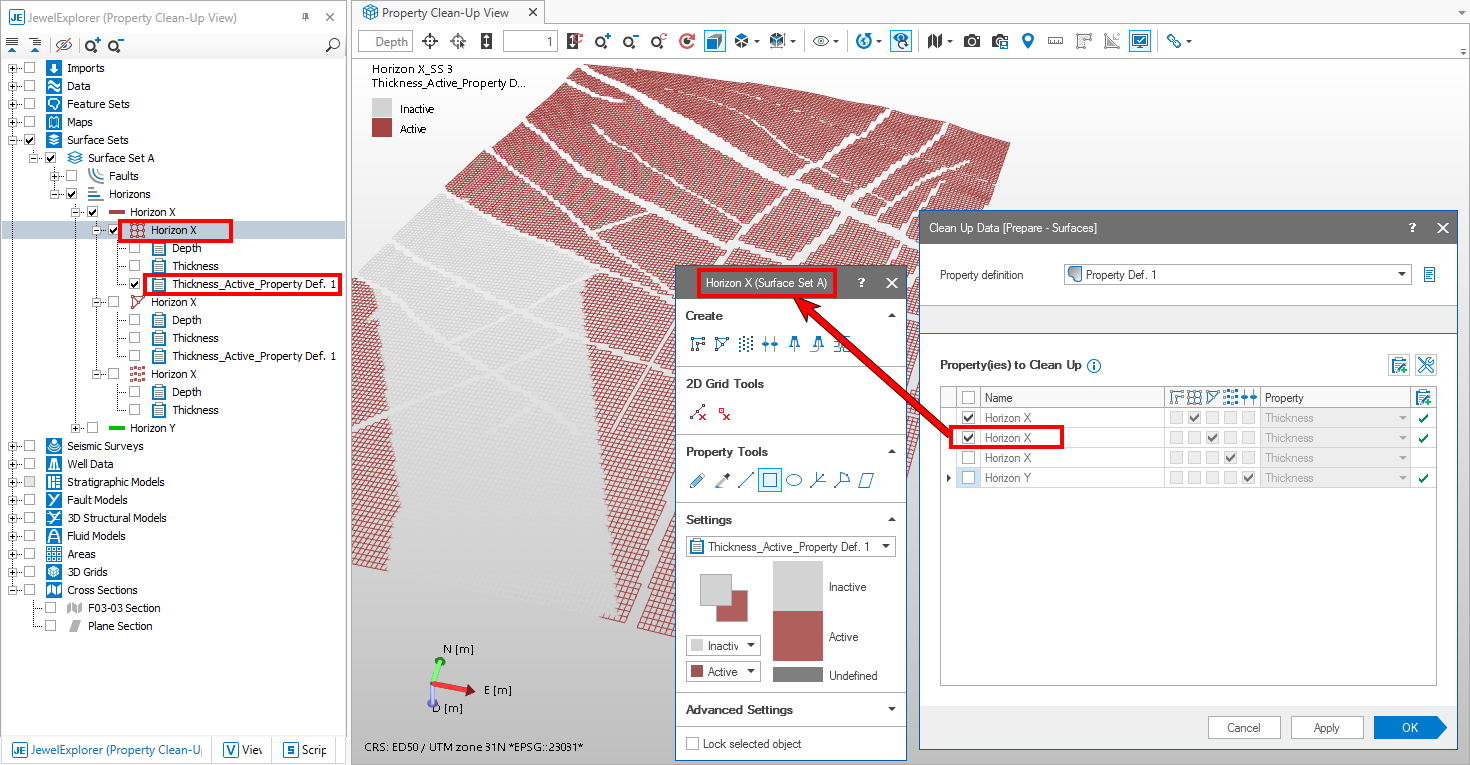
The editing tools floating palette and the Property Clean-Up View respond to the representation you select in the table (Horizon X in the example above). Note the gray band on the 2D grid in the view: these are nodes set to 'inactive'. click to enlarge
To edit the 'active property' of a marker
To make sure the 'active property' is used during property creation