Assign Data
After creating the case, the next step is to assign a 3D mesh and a geomechanical model. These will be used to generate the geomechanical properties that serve as input for the simulation deck. If you edit these properties, make sure to perform the 'Build Deck' step so your changes are included in the simulation.
To assign data
- Open the Assign Data form.
- Select the Abaqus case you want to use from the drop-down list.
- Select a 3D mesh from the drop-down list.
- Select a geomechanical model from the drop-down list.
- Specify the Property folder name. This is the folder where the geomechanical properties will be written. The folder will appear in the JewelExplorer under 3D Meshes > your 3D mesh > Properties.
- By default, the folder name is the same as the selected geomechanical model name.
- If the folder already exists, you will be prompted before any properties it contains will be overwritten.
- If you enter a different name, a new folder will be created.
- Set pore pressure variable in Reservoir Zone only (Optional) When this option is selected, only Volumes of Interest (VOIs) marked as Reservoir Zone in the geomechanical model (MODEL > Geomechanics > Modeling > Pore Pressure) will be simulated with pore pressure. Any VOI not marked as Reservoir Zone on the Pore Pressure form will receive no pore pressure field variable and will be modeled as 'non-porous'.
-
If the selected geomechanical model uses functions to calculate material parameters, the form displays a table listing these parameters per VOI. For each variable that is used in a function, assign an existing property in the Property column. From the drop-down list, you can select a property that has the required property type and is available for the selected 3D mesh. Properties from another geomechanical model mapped to the same 3D mesh can also be used.
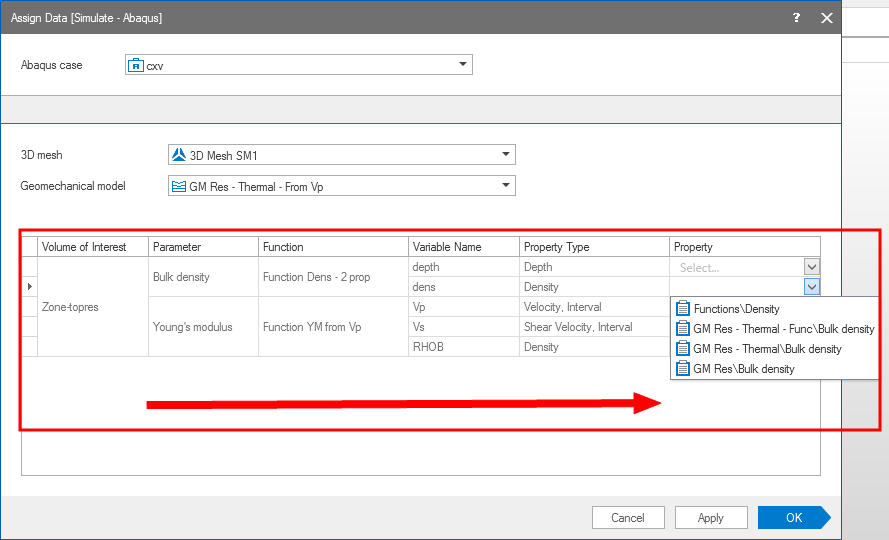

Read the table from left to right. Only the last column, Property, is editable and used to assign existing properties for function variables. click to enlarge
- Click OK to assign the data and go to the next form Initialization, or click Apply to keep the form open. At this point:
- The validation of the values is executed. If any value is outside the valid range, an error dialog appears and you cannot continue the workflow. The following rules apply upon validation:
- Young’s modulus and density must be positive.
- Poisson’s ratio must be between 0 and 0.5.
- Expansion coefficient and reference temperature must be positive and in SI units.
- Mesh properties on the nodes are created for all selected parameters, except thermal parameters if you selected 'isotropic thermal' as the material model on the Material Properties form. The properties are stored in the folder you defined in step 5 and will be used as input to the simulator deck. The thermal parameters are written directly to the deck for the relevant zone. If you have defined an initial temperature, a mesh property is created and included in Initial Conditions. To properly include temperature effects, see Modeling thermal effect.