The Case Explorer
The Case Explorer helps you organize all of the simulation cases in your solution. You can show or hide the Case Explorer by selecting Workspace > Panes > Case Explorer, or by pressing Ctrl+F4 on your keyboard.
The Case Explorer is structured as a standard tree hierarchy, with icons that allow you to expand or collapse each branch by clicking the triangle icon next to it. You can double-click any section to open its corresponding view. For example, double-clicking the Well Groups section will open the Well Groups view.
Right-clicking within the Case Explorer opens a context menu with options that vary depending on the selected item. The following section outlines the available context menu options for each object type, for example a case, a section or a section component.
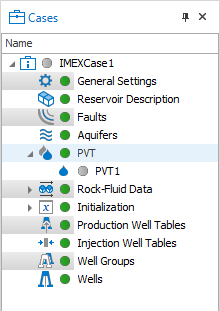
Simulation cases contain data sections and section components. For example, 'PVT' is a data section, while 'PVT1' is a specific section component within that section. click to enlarge
Right-click in the blank (white) space below the listed cases to open the general context menu.
New folder Adds a new folder to the Case Explorer. You can use folders to organize multiple cases.
Right-click a user-created folder in the Case Explorer to access this menu.
New folder Adds a subfolder for further organization.
Duplicate Creates a copy of the folder and all cases it contains.
Delete Deletes the selected folder and its contents.
Right-click a simulation case item to open its specific context menu.
Show View Provides shortcuts to various views related to the selected case.
Open Case Folder Opens the folder (in Windows™ File Explorer) that contains the data files for the selected case.
Duplicate Creates a copy of the selected case and adds it to the Case Explorer.
Convert to tNavigator Case (Applicable to Eclipse cases only) Converts the current Eclipse simulation case to tNavigator format. The converted tNavigator simulation case is automatically named as ‘<your case name>_ECL_convert’.
Convert to Eclipse Case (Applicable to tNavigator cases only) Converts the current tNavigator simulation case to Eclipse format. The converted Eclipse simulation case is automatically named as ‘<your case name>_tNav_convert’.
Build and Edit Deck Opens the Build and Edit Deck form.
Run Simulations Opens the Run Simulations form.
Validate Case (Applicable to Abaqus cases only) Checks the validity of the deck. The result of the check appears in the Output Info view. In the Case Explorer, a green circle icon next to case name indicates that the deck is valid, while a pop-up error message indicates that the deck is invalid.
Run (Applicable to Abaqus cases only) Starts the simulation for the selected case.
Delete Deletes the selected case.
Right-click an individual section within a simulation case to open its context menu.
Edit section Opens the view for the selected section, allowing you to make edits.
Right-click an individual section component within a section to open its context menu.
Edit section Opens the view for the selected section, allowing you to make edits.
Duplicate Creates a copy of the selected section component and adds it to the Case Explorer.
Drag and drop
You can use drag and drop to organize simulation cases within the Case Explorer.
This feature is especially useful for grouping simulation cases into folders. For example, you can create a new folder using the context menu and drag simulation cases into it. Case folders can be nested and may contain a mix of IMEX™, GEM™, STARS™, ECLIPSE™, tNavigator™, and Abaqus™ cases.
In addition to organizing cases, you can open solutions on separate instances of JewelSuite Subsurface Modeling and drag a simulation case from the Case Explorer of one instance into the Case Explorer of another instance.
You can also copy individual data section components using drag and drop. For example, to copy data from the PVT section of one case, simply drag that section component (or multiple selected section components) into another case.
Working directory
When you select a simulation case, the Property Inspector tab in the Inspector displays a summary of the case. One key property is the working directory, i.e., the file path where all files related to the simulation case are stored, such as the deck files and the simulation results files.
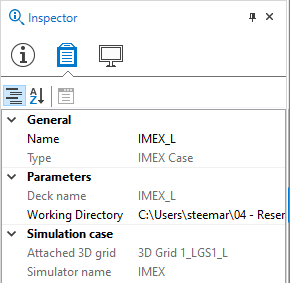
The working directory of the selected case as displayed in the Inspector. click to enlarge
Behavior of the working directory
- If the solution has not been saved, the working directory will be the temporary directory for the logged-in user.
- If the solution has been saved, the working directory will be the same directory as the saved solution.
- Each solution has a corresponding cases folder (*.Cases). This folder contains all simulation cases and their associated data.