The View Explorer
The View Explorer click to enlarge
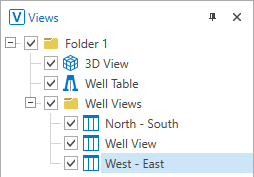
In the View Explorer, all your open views and tables are listed in a tree structure. To organize the views and tables in groups, you can create (multiple levels of) folders using the context menu of the View Explorer. To move a view to or from a folder, select the view and drag it to the required folder. By arranging the various views into groups that you want to view at the same time, you can easily manage the views without having to open and close individual views again and again.
Deselecting the checkbox of a folder will hide all views in the folder. This can be useful if you have many views and/or tables open and the bar at the top of the view area becomes cluttered with tab names. The View Explorer also allows you to easily show/hide your individual views by using the checkboxes. The active view is highlighted in blue.
When you organize your views inside a folder, the folder checkbox can have the following statuses to indicate the visibility of the views:

|
All the views inside the folder are visible. |

|
None of the views inside the folder are visible. |

|
Some of the views inside the folder are visible. |
You can also create new views and tables using the context menu of the View Explorer.
You can show or hide the View Explorer at any time by selecting Workspace > Panes > View Explorer, or by pressing Ctrl+F9 on your keyboard.
If you right-click anywhere in the View Explorer, the following options become available.
Create Open a view or table from the list.
New Folder Creates a folder in the View Explorer. Double click on a folder to rename it.
If you right-click on a folder in the View Explorer, the following options become available:
Create Open a view or table from the list.
New Folder Creates a folder in the View Explorer. Double click on a folder to rename it.
Delete Delete the object from the solution. Depending on the type of object, geometric representations, subfolders or objects it may contain are deleted as well.
If you right-click on an individual view in the View Explorer, a number of options become available.
Hide Hide the view from the main view area. You can restore a hidden view via the View Explorer.
Show Show a hidden view in the main view area again. This option only appears in the context menu of a hidden view in the View Explorer.
 ). Views with dedicated names, such as the Seismic View, where the name refers to the selected seismic slice that is on display, cannot be renamed.
Duplicate Create a copy of the view with all the view settings, except the view linking state.
Link / Unlink
Link Visibility This option shows/hides objects simultaneously in multiple views. Select this option in all views where you want to link visibility.
Link Camera This option controls the rotation, panning, zooming and depth/area scaling in multiple views simultaneously. Select this option in all views where you want to link the camera.
Link Cursor With this option you can see the movement of your mouse cursor in multiple views. Select this option in all the views where you want to see the movement of your mouse cursor.
Float Detach the view from the main view area so you can drag it. Alternatively, you can double click on a docked view's tab to float it.
Dock Bring the floating view back to the main view area. This option only appears in the context menu of a floating view's window.
New Horizontal Tab Group Split the current view area horizontally in half and place the view at the bottom.
New Vertical Tab Group Split the current view area vertically in half and place the view on the right.
Delete Delete the view. The view is removed from the View Explorer and cannot be restored.
Working with multiple views side-by-side, while having them linked, can improve your data analysis significantly. There are various options of linking multiple views that can help you better visualize, understand, analyze and compare your data.
Once you have all your views arranged in the main view area, you can simultaneously perform the following actions in the linked views: you can rotate, pan, zoom, and scale; you can show or hide multiple objects and properties; or you can choose to see the movement of your mouse cursor which is spatially correlated in your linked views.
The view linking options can be used for 2D views, 3D views
For more information about each view linking option, see
You can enable/disable the view linking options in different ways:
Via the context menu (the View Explorer or the View Tab)
- Right-click on a view in the View Explorer or on a view tab to open the context menu.
- Hover over the Link / Unlink option and select one of the view linking options of interest (i.e. visibility, camera, cursor).
- Repeat the first two steps for as many views as you want to enable/disable linking for.
Via the Toolbar
- In the toolbar of the view, click the View Linking drop-down list
 .
. - Select one of the view linking options of interest (i.e. visibility, camera, cursor).
- Repeat the first three steps for as many views as you want to enable/disable linking for.
- As an option, you can select Unlink All Views which will disable all the view linking options for all the linked views at once.
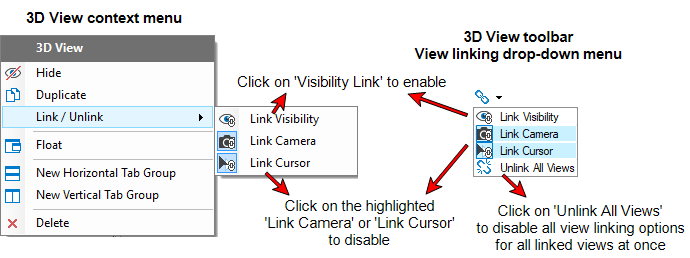
How to enable/disable view linking options via the context menu or via the toolbar. click to enlarge
Via multiselecting in the View Explorer
- Select multiple views in the View Explorer by holding down the Ctrl key and clicking each of the views you want to select, or by holding down the Shift key to select a range of views.
- Right-click on a selected view in the View Explorer to open the context menu.
- Hover over the Link / Unlink option and select one of the view linking options of interest (i.e. visibility, camera, cursor).
Recognizing the active state of view linking
You can recognize the active state of view linking option in several different ways.
When the view linking is enabled, in the View Explorer and on a view tab, every linked view's icon will have an overlapping little chain. For example: 2D View linked icon ![]() , 3D View linked icon
, 3D View linked icon ![]()
![]()
Also, in the View Explorer, the little icons denoting the enabled view linking options are displayed at the right side of a view. For example: Icon denoting the visibility linking is enabled ![]() , icon denoting the cursor linking is enabled
, icon denoting the cursor linking is enabled ![]() , icon denoting the camera linking is enabled
, icon denoting the camera linking is enabled ![]() .
.
In the View Explorer, the little icons on the right denote which view linking options are enabled. click to enlarge
In the context menu of a view, the view linking options which are enabled are highlighted. You can see the context menu of a view either by right-clicking on a view tab or right-clicking on a view in the View Explorer.
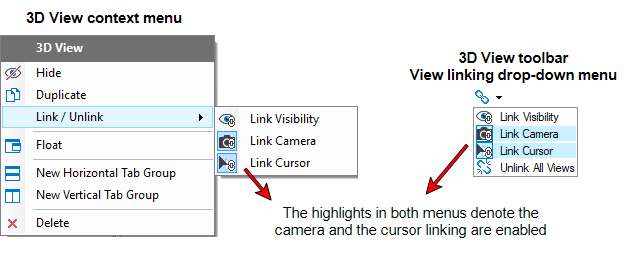
In this example, you see the context menu of a 3D View on the left and the view linking drop-down menu in a 3D View toolbar on the right. The highlights in both menus denote the camera and the cursor linking options are enabled. click to enlarge
Controlling linked views
When you enable cursor linking or camera linking between two or more views, there is no fixed master view which is in control of the other linked views. This gives you the flexibility of hovering your mouse cursor over any view you want and from that view you can control your view linking experience.
The same goes for the visibility linking behavior, where there is no fixed master JewelExplorer which is in control. The active view, which is displayed in the header of the JewelExplorer pane, drives the changes in other linked views.