JewelScript Editor
The JewelScript Editor tool (Workspace > Tools, or Shift+F4) enables you to create automated scripts, referred to as JewelScripts, that can be used for automating repetitive manual tasks. The form consists of a selection of the modeling workflows and tools available in JewelSuite Subsurface Modeling, and also lists all the JewelScripts that you have created.
You can create JewelScripts that combine the modeling workflows along with the available tools and/or other JewelScripts, and generate automated JewelScripts that can be applied in iterative workflow scenarios. For any modeling workflow that you have added to your JewelScript, you can change the input data for its corresponding modeling steps (called 'intermediate steps' in the script editor, see image below). This way, you can quickly rerun workflows with different data sets, or even modify an existing JewelScript to match the objectives of your solution. All the JewelScripts in a solution are stored in, and can be accessed via the Script Explorer.
Values and settings that you change in models and tools via the script are not transferred to the corresponding workflows and tools that are accessed via the main strip of the application. The changed values and settings initially only exist in the script. This is called 'decoupled JewelScripts'. Only after the script has been run, the values are transferred to the workflows and tools in the main strip. This way you can make multiple scripts, run them, and investigate their outcomes. Before you do that, however, it is important to create a reference script which you can run to reproduce all your original values and settings. See Working with decoupled JewelScripts.
A quick way to create a JewelScript(s) that can reproduce the domain models associated with a particular concept (i.e. the backward chain of models and inputs that ultimately lead to the saturation model and NTG model) is by using the JewelScript from Concept tool. JewelScripts generated with this tool are read-only. This allows you to update the associated domain models and inputs in the concept for analysis purposes, while safeguarding your original domain models and settings via the script. In case you want to perform the updates via a script, duplicate the read-only script (the duplicate is editable).
At the top of the JewelScript Editor form you can create a new JewelScript, or select an existing JewelScript that you want to use. Below that is an area with two sections: Workflows, Tools and Scripts in the Script Item Catalog on the left and JewelScripts on the right side of the form.
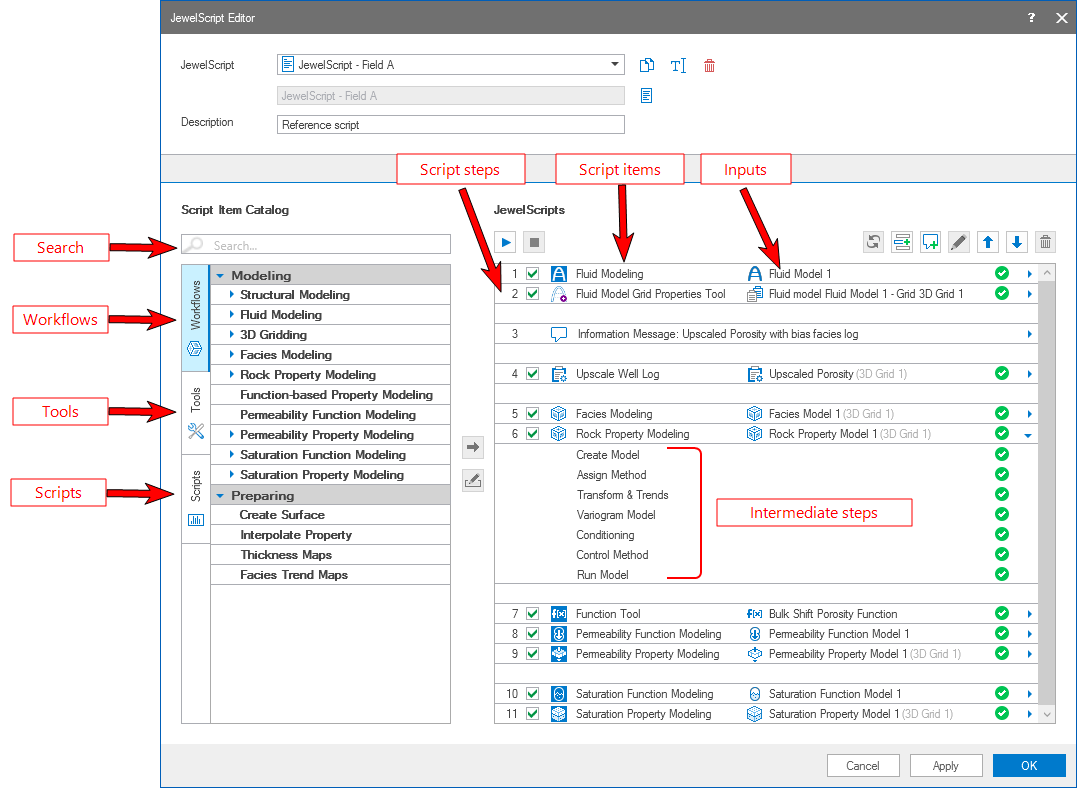
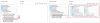
The JewelScript Editor with the script item catalog (left side) and a script run completed (right side). click to enlarge
Workflows, Tools and Scripts in the Script Item Catalog
The modeling Workflows ![]() , Tools
, Tools ![]() and Scripts
and Scripts ![]() are placed in adjacent tabs in the Script Item Catalog section. Every modeling workflow, tool or JewelScript added to the JewelScripts section is referred as a 'script item'. Switch between the tabs to select the script items to add to your JewelScript.
are placed in adjacent tabs in the Script Item Catalog section. Every modeling workflow, tool or JewelScript added to the JewelScripts section is referred as a 'script item'. Switch between the tabs to select the script items to add to your JewelScript.
When you have multiple JewelScripts in your solution, you can also add script items from one JewelScript to another using copy (CTRL+C) and paste (CTRL+V).
The Workflows tab contains a range of modeling workflows that are available in the application. The workflows are organized in groups according to the modeling phase they belong to, i.e. 'Preparing' or 'Modeling'. Every workflow has at least one associated domain model (e.g. fluid model, facies model, rock property model, saturation model, etc.) in your solution. Use the drop-down arrow at the left of the workflow item to see all the domain models for that specific workflow. Behind the domain model (only when applicable) the name of the associated parent model is given in light gray and between brackets.
The Tools tab consists of a range of tools that you can use multiple times in a JewelScript to perform iterative operations (e.g. shift logs and smooth logs for multiple wellbores). The tools are organized in the functional groups 'General', 'Logs', 'Post-Processing' (referring to the prepare > Post-Processing strip) and 'Thickness Maps'. Use the drop-down arrow at the left of the tool to see all the properties, logs and functions that exist in the solution for that specific tool. Behind the names of the properties, logs and functions, the name of the associated domain model is given in light gray and between brackets.
Depth Well Matching (Post-Processing Tools)
Fluid Model Grid Properties Tools
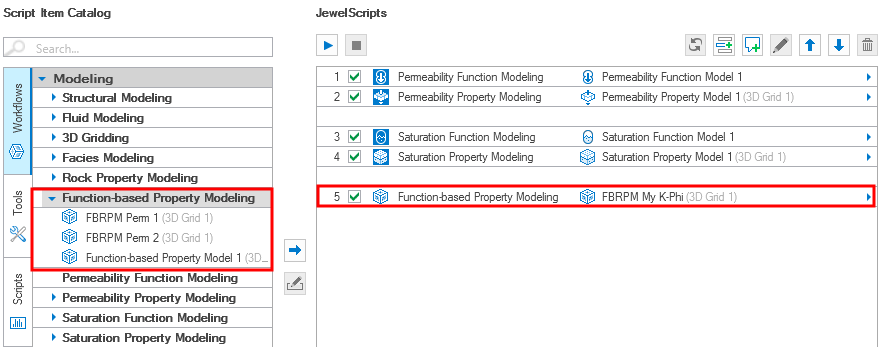
The Scripts tab consists of all the JewelScripts that are available in your solution. You can use the listed JewelScripts as a script item in another JewelScript. A script that is used in another script is called a nested script. You can use nested scripts for example when a permeability (or any other property) calculation consists of many steps with the property calculator and you want to use this permeability for different grids (e.g. P10, P50, P90 grid), when working with the Post-Processing tools or when you do a shift of all logs and you have many wells. Another example to use nested scripts is in when you are still in the exploring phase, and you have identified multiple ways to calculate e.g. porosity. In this case you can create a script per porosity calculation and you can try out the different scripts.
Upon opening the Scripts tab, use the drop-down arrow on the left of the JewelScript name label to show the available JewelScripts.
Creating a JewelScript
- To create a new JewelScript, select
 Create new from the drop-down list. Enter the name of the script in the field below. Optionally, you can also enter a Description for the script in the field below.
To edit an existing JewelScript, select the script from the drop-down list. The script name (read-only) is shown in the field below. You can edit the description for an existing script. Use the toolbar options to duplicate, rename or delete an existing script.
Duplicates the currently selected JewelScript in the drop-down list (i.e. the active JewelScript). 
Opens the Rename dialog, where a new name can be given to the active JewelScript. 
Deletes the active JewelScript. - Build the JewelScript with script items from the Script Item Catalog. If you want to quickly find a specific script item in the catalog list, start typing in the search field above, and the list will filter to display relevant items. In the case of Workflows, you can either select the modeling workflow, or use the drop-down arrow to the right of the workflow to select the associated domain model.
Select a Workflow, Tool or JewelScript from their respective tabs and then choose one of the following two methods to add script items to your script:- Add script items one-by-one with the blue 'Add script item' icon (
 ). After selecting a catalog script item, the blue arrow to add the item to the JewelScript is activated. Click on the icon to add the selected script item to the JewelScript. When a workflow with an associated model or a JewelScript is added to the script, it is removed from the catalog.
Add the modeling workflow directly to the JewelScript by selecting the model from the drop-down list in the script item catalog section. Note that you can only use the model once in the JewelScript. click to enlarge
- Add a range of script items with the 'Create JewelScript from a single domain model' icon (
 ) . This button is only available when you have not yet assigned any script items to the JewelScript. After selecting a workflow catalog domain model, click the icon: all script items on which the domain model is dependent, are added to the JewelScript. An editable top and bottom comment script item is automatically added as well. You can continue adding additional script items with the blue arrow () if you wish.
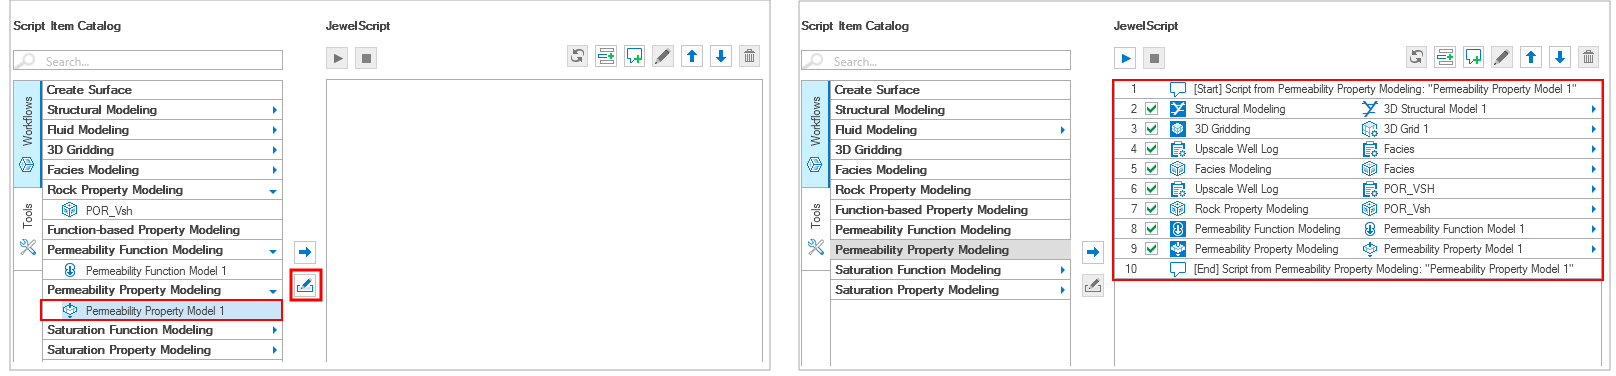
Select a domain model from the drop-down list in the script item catalog and click the 'Create a JewelScript from a single domain model' icon. A JewelScript consisting of the domain model and all items of which it is dependent, is created. click to enlarge
- Add script items one-by-one with the blue 'Add script item' icon (
- You can use different combinations of the Shift and Ctrl keys to select multiple items from the catalog and add them to the JewelScript. To insert a catalog script item under a specific JewelScript script step, select the script item by clicking on it in the JewelScript. The selected script step is highlighted in blue. Next, click on a script item in the script item catalog. The script item clicked in the catalog is now highlighted in blue and the JewelScript script item is highlighted in gray. Add the new catalog script item by clicking on the add item icon . The script catalog script item is inserted below the previously selected JewelScript script item in the JewelScript. Once you have added one or more script items to the JewelScript, you can click Apply to save the JewelScript at this stage and run it later.
- (Optional) When you have multiple JewelScripts in your solution, you can also add script items from one JewelScript to another using the keyboard combinations to copy (CTRL+C) and paste (CTRL+V). The following rules apply:
- You can only copy JewelScript items between JewelScripts in one instance of the application.
- If you copy a script item that contains a model you already use in the 'target' JewelScript, that model is removed from the copied script item.
- To copy a script item, select the script item by clicking on it in the JewelScript. The selected script item is highlighted in blue. Press CTRL+C.
- To insert a catalog script item under a specific script step, select the script item by clicking on it in the JewelScript. The selected script step is highlighted in blue. Press CTRL+V, the copied script item is inserted below the selected JewelScript step. If you do not select a specific location, the copied script item is inserted as the last item in the JewelScript.
- A copied script item is checked by default in the target JewelScript.
- In the JewelScripts section, use the toolbar options to organize or remove the script items and run / stop the JewelScript workflow.

Run the JewelScript. 
Stop the currently running JewelScript. 
Overwrite selected script item(s) settings with the current workflow settings. 
Insert an empty line between script items. 
Insert a script item with user-defined text. 
Edit the selected script item. 
Move the selected script item(s) one step up in the JewelScript. 
Move the selected script item(s) one step down in the JewelScript. 
Remove the selected script item(s) from the JewelScript. - Check the checkbox to include or exclude script items from the JewelScript run. Checked script items are included in the JewelScript, while unchecked script items are excluded.
- Make sure that each script item has data assigned to it in the form of a model, property, function or well log. To do this, double click on the script item or click on the Edit selected item icon in the toolbar:
- When the script item is a workflow, a dialog opens where you can select the relevant model / property / function/ well log from a drop-down.
- When the script item is a tool, the specific form for the tool opens for you to assign the relevant data.
- When the script item is a JewelScript, another instance of the JewelScript Editor opens with the JewelScript selected.
- Script items which are workflows can consist of many workflow steps (e.g. Facies Modeling contains several workflow steps: Create Model, Assign Method, Variogram Model, etc.). In the Script Editor, these steps are called 'intermediate steps', see image below. Visualize these intermediate steps with the small arrow at the right side of the script item. To access the form of an intermediate step, double click on the step or use the Edit selected item icon from the toolbar. Make your edits and click Apply or OK on the particular form to save your changes.
- Optionally, add one or more comment lines to the script with the info message icon
 in the toolbar. When you run the JewelScript, the comments will be listed in the Output Information pane (Workspace > Panes > Output Information).
 - After you have added the required script items, click the Run icon
 in the JewelScripts toolbar. The JewelScript will be saved and listed in the Script Explorer. As the JewelScript runs each script step, the status of each script item in the workflow is updated with icons on the right side of the JewelScript section. Click the Stop icon
  in the JewelScripts toolbar if you want to abort the script execution.
Once you have added one or more script items to the JewelScript, you can click Apply to save the JewelScript at this stage and run it later.
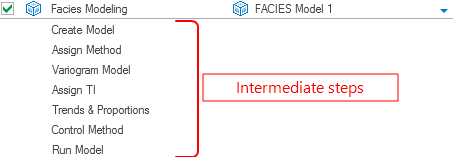
Visualize the intermediate steps for a modeling workflow using the drop-down arrow on the right side. To access the form of an intermediate step, double-click on it, or use the assign data icon above the table. click to enlarge
Working with decoupled JewelScripts
The primary objective of JewelScripts is to improve the automation capability of the modeling workflows, tools and (nested) JewelScripts. JewelSuite Subsurface Modeling allows you to create JewelScripts wherein you can change the inputs in the intermediate steps of the modeling workflows and tools. When you make changes to the intermediate steps in any of the script items via the JewelScript Editor and click Apply at the base of the JewelScript Editor form, the changes are saved to the JewelScript. At this point, the changes on the form that you made via the Editor are not transferred yet to the same form in the workflow strip. This is called 'decoupled JewelScript'. The input changes are incorporated on the forms on the main strip only when you Run the JewelScript.
The facies modeling and rock property modeling workflows use Volumes of Interest (VOI's). Each VOI defines a 'part' of the 3D grid. If there are dependencies between these models (e.g. the rock property model is dependent on the outcome of the facies model), make sure that both models incorporate the same VOI's.
Proposed working methodology with decoupled JewelScripts
To keep the original settings of the domain models that are created via the main strip in JewelSuite Subsurface Modeling, it is highly recommended to create a reference JewelScript before you run any script. This so-called 'reference script' contains the original domain models with the inputs and settings as specified via the modeling workflows of the main strip. This allows you to create separate scripts which will assess the sensitivity of modeling parameters on the output.
- The first step is to create a reference JewelScript that reproduces the reference models, i.e. the models as specified originally via the main strip (an appropriate name could be 'Reference script'). This means creating the script without making any changes to the settings/inputs on the forms. Click Apply at the base of the JewelScript Editor to save the reference script.
- Duplicate the reference script using the 'duplicate' icon
 at the top of the form, and (optionally) rename the new script using the 'rename' icon
  next to it.
 - For the script items in the JewelScripts section, modify the selected models and tools or modify the inputs in the intermediate steps of modeling workflow. Click Apply on each form where you make changes. For any changes in the intermediate steps, you must ensure that the inputs which are inter-dependent between consecutive forms are updated and validated. For example, if you change the facies modeling method for a specific VOI's, then the inputs in the consecutive intermediate steps in the workflow must also be updated.
Important Some intermediate steps of modeling workflows are not available in the Script Editor. You must provide the inputs on these forms from the main strip. E.g., experimental variogram data for facies modeling and rock property modeling is not available in the Script Editor since it is dependent on the assigned method for specific VOI's to model the facies or a rock property.
- Apply your changes to save the inputs to your JewelScript. Ensure there are no missing inputs or errors due to invalid or incomplete inputs that you have provided.
- At this stage, you can either create more JewelScripts or run this JewelScript with the modified inputs.
- After running the new JewelScript, the input data on the workflow forms and tools of the main strip are updated with the data that was entered via the JewelScript Editor. In addition, the resulting models are regenerated using the modified inputs.
- To restore your reference model inputs, run the reference JewelScript that you created in step 1.
The workflow below shows the algorithm to create JewelScripts.
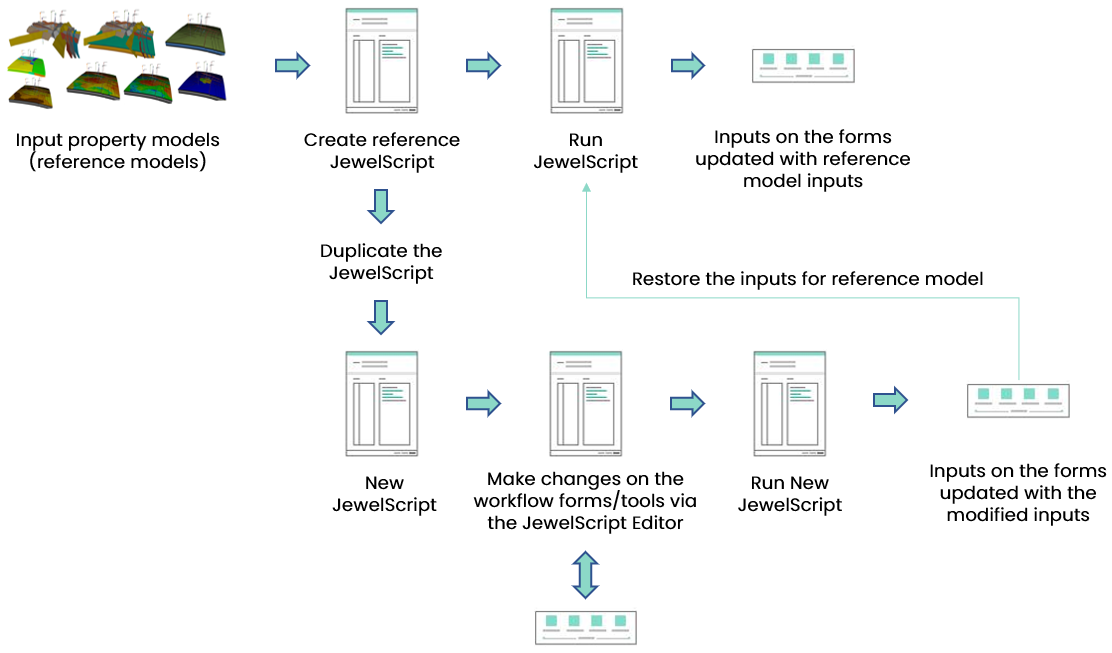
Workflow on creating JewelScripts, and restoring reference model results, using the Script Editor. click to enlarge
Overwrite JewelScript item settings with workflow settings
To quickly revert the settings in a script item back to the current workflow settings or to overwrite a script item with changes made to your workflow settings for any reason, use the Overwrite script items icon ![]() in the toolbar.
in the toolbar.
Script items which are workflows can consist of many workflow steps. You can visualize these 'intermediate steps' with the small arrow at the right side of the script item. When overwriting a workflow script item with multiple intermediate steps, be aware that all these steps will be overwritten.
- Select a single, multiple or all workflow script items in the JewelScript editor you wish to overwrite with the workflow settings. The Overwrite script items icon is activated.
- Click the Overwrite script items icon . The Overwrite Script Items warning is triggered and displayed.
- Click Yes on the Overwrite Script Items warning dialog. Your script items are now overwritten. You can still click Cancel on the JewelScript editor window to discard the changes to script items.
- Running the JewelScript saves the changes to the script items. Alternatively you can click Apply in the JewelScript editor to save the overwritten script items and run the JewelScript later.