Importing custom file types
Selecting the Custom format when importing your data allows you to manually define each column of your data. It is useful when you have data to import that is well-structured but not in a standard format.
To import a custom file type, click the icon in the Data strip to import the data type of this file. From the Files of type drop-down list in the Import dialog box that appears, select Custom Format. Navigate to the location of your data file, click on it to select it and then click Open.
The 'Custom Format Data - Step 1/2' form appears. In the first step of the import process you specify the type of data within each of the columns, the units, and select which columns will be imported.
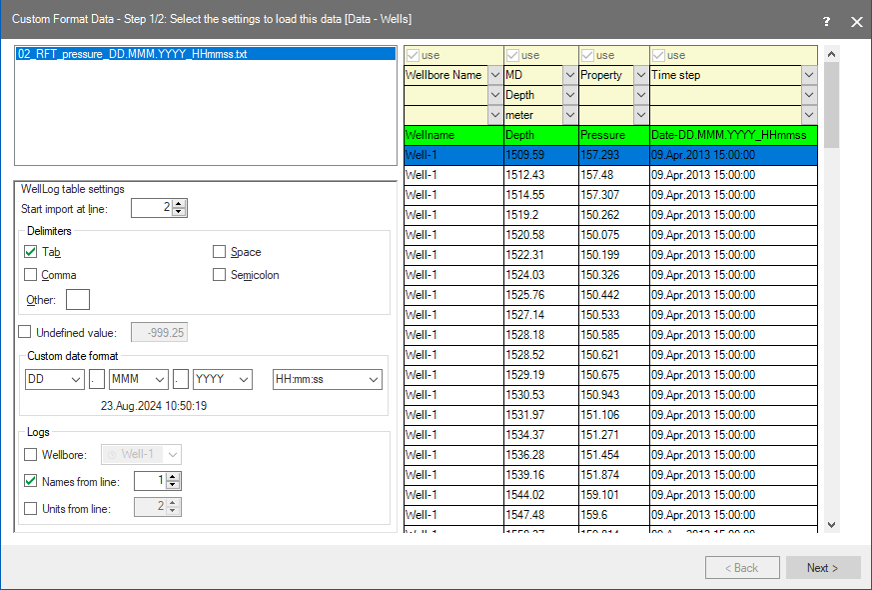
The Custom Format Data form. click to enlarge
Each of the files you selected for importing appears at the top left of the form. The bottom left pane shows the import settings, while the pane on the right shows the data of the selected import file and the selected data columns.
Import settings
First, specify the settings for the import in the bottom left of the form. The options you see depends on the type of data you are importing.
In the Start import at line field, specify the number of the first import line. As you adjust this value, the highlighted row in the data table will move to reflect which line of data the import will start at.
In the Delimiters section, check the checkboxes to specify the character or characters used in the file to separate the columns in the file, or enter a different character in the Other field.
Check the Undefined value checkbox if you want to use the value in the adjacent field when there is no value provided in the data import file. You can enter your own value in the field.
In the Custom date format section (available for log and production data), you can specify the date and time format of the Time step input data. Select a date and time format from the drop-down lists and type the separator character in the in-between text fields. The date format should be the same as the format in the import file. Under the drop-down fields, you can see an example of the format which interactively changes with your selections, based on your current time and date.
For some types of data, you can also select to import only some of the lines. To do this, check the Use step size checkbox and enter a value in the field. A value of 2 will mean every other line will be imported.
CRS
- If your import data has a CRS which was read from the import file, the field next to the Blue Marble button is auto-filled (it is not editable). You can click the Info-icon to read the details of the CRS.
- If no CRS was read from the import file but your solution has a CRS, the field next to the Blue Marble button is set to 'Undefined'. In this case, select the CRS that is correct for your import file using the Blue Marble button.
In the Columns section, select from a range of possible options for which data columns are in the file. The column data pane on the right will update with your selection. If you select Custom, a number of columns appear that you can define as required.
Setting the data columns
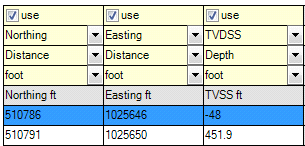
Column data pane. click to enlarge
After completing the import settings at the bottom left of the form, the column data should have the required number and type of columns, but possibly not in the correct order. You can change the column’s identity in the yellow rows.
The order of the columns is shown in the Preview area of the File selection window.
In the yellow rows:
Ensure that the use checkboxes in the first yellow row are checked for each column you want to import. If the file contains a column that should not be imported, for instance because its Data Identity cannot be recognized, the column must be skipped, uncheck use for that column.
Select the identity of the data in the second yellow row (Easting, Northing, TVDSS, etc.).
Select the data type in the third yellow row, and in the last yellow row, select the unit for the data.
When the settings are as you wish, click Next >.
The 'Custom Format Data - Step 2/2' form displays a table with the objects available for import.
- If your solution has a CRS, that CRS is shown at the upper left side of the form, together with its associated Horizontal Unit.
- If you are importing well trajectory data, the Trajectory definition, Azimuth reference and Apply scale factors controls are present at the upper right side of the validation form:
- Trajectory definition If your import file contains both a Deviation Survey (MD, Inclination, Azimuth) and a Position Log (Easting, Northing, TVD), you can select from which trajectory data type the wellbore will be created. For the computation methods, see Wellbore deviation surveys - Minimum Curvature method.
- Azimuth reference If 'Deviation Survey' was selected under 'Trajectory definition' and the azimuth reference (either Grid North or True North) is specified in the import file, that azimuth reference is selected to create the wellbore. If 'Deviation Survey' was selected and the azimuth reference is not specified in the import file, you are required to check the data and select Grid North or True North. Once imported, all spatial data has a Grid North azimuth reference (see Azimuths and their north references for more information).
- Apply scale factors If the import file indicates a grid scale factor, the control is automatically set to Yes and a specific grid scale factor for every depth station is obtained from Blue Marble and applied during the creation of the wellbore. If no grid scale factor is present in the import file, you can choose whether to apply the scale factors, or not. For more on scale factors, see The grid scale factor and elevation factor.
Click Finish to complete the import. Otherwise, click < Back to adjust your import settings.