Working with seismic data
When starting a new modeling project in JewelSuite Subsurface Modeling you may need to import seismic data for interpretation or quality control purposes, see Importing and optimizing seismic data. If you already have horizons and faults interpreted outside of your solution you can import these too, see Importing horizons and faults and Working with data connectors. If you have seismic data but no interpretation yet, you can create your own interpretation, see Interpreting seismic data.
If you have seismic data to import, your first step should be to follow the Import workflow (Data > Seismic > Import) of the strip. For details, see Importing your seismic files. After importing seismic data, you will find it in the Seismic Surveys folder in the JewelExplorer.
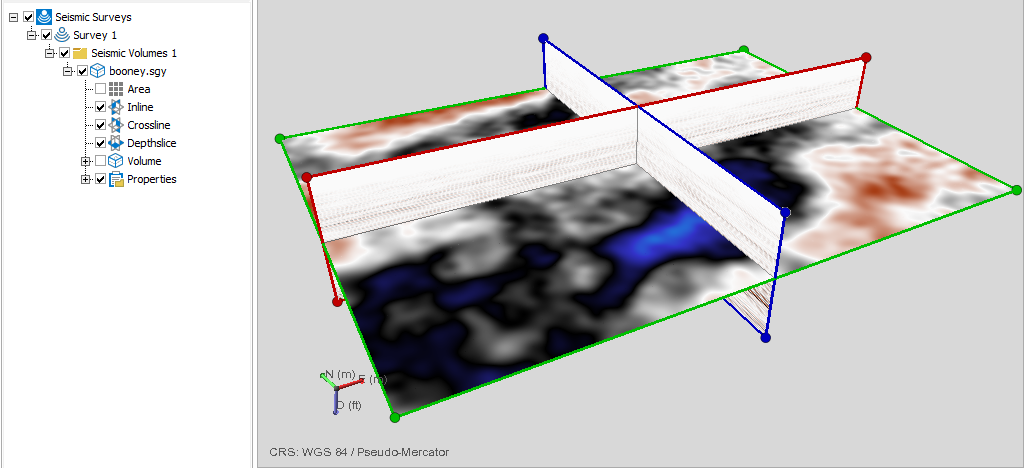
Newly imported seismic data in 3D view and the JewelExplorer. click to enlarge
The data is stored in a folder called Survey 1 by default, but you can easily rename it (double click on the name in the JewelExplorer). As yet, there will be no interpretations in the survey. If you have horizon or fault interpretations created outside JewelSuite Subsurface Modeling, you should import them now. See Importing horizons and faults for details. After importing these horizon and fault interpretations, they are stored in the Imports folder in the JewelExplorer and are not yet associated with your seismic survey yet. Assign these surfaces to the seismic interpretation using the Seismic Interpretation workflow ( prepare > Seismic > Seismic Interpretation) if you want to quality control these surfaces against your seismic data, or if you want to merge multiple interpretation sets. Upon assigning them, your surfaces will be resampled according to a seismic survey resolution. See Preparing an interpretation from existing surfaces for details. When you have done this, you can use various tools to edit and clean-up your data (see Seismic tools).
If you do not have any seismic data to import, but you do have horizon or fault interpretations, your first step will be to import them. See Importing horizons and faults. Your newly-imported horizons and faults will appear in the Imports folder in the JewelExplorer. The preferred way to proceed would be to assign the imported interpretations to a surface set. However, you can also (as an advanced user) create a (synthetic) 3D survey and proceed to the Seismic Interpretation workflow to associate the interpretations with it, see Preparing an interpretation from existing surfaces for details.
If you have imported seismic data, but do not have any interpreted horizons or faults based on this data, you can create your own seismic interpretation and interpret structures (faults & horizons) using autotracking and other seismic editing tools. See Graphically creating a seismic interpretation for details.