Cleaning up horizons
Typically, horizons derived from a seismic interpretation have been interpolated across the field without a proper incorporation of fault displacement. At fault intersections, these horizons typically display unrealistic fault displacements in the form of horizon smearing, dragged horizons and inconsistent fault throw/kinematics, instead of proper offset. It is therefore important that these erroneous data points in close proximity to faults are ignored during construction of the (horizon) surfaces with the Construct surfaces step of the Structural Modeling workflow. For this you can use the Horizon Clean-Up form (Model > 3D Structure > Horizon Clean-Up or Model > Faults > Horizon Clean-Up) with which you can define regions around each fault where horizon input data will be ignored during (horizon) surface construction.
Rather than deleting these unwanted/erroneous data points, they receive the status 'inactive' in a horizon property called 'Active_<name of the fault model>'. This property is read by the application during surface construction. By making use of a property, original input horizon data is preserved and previously performed clean-ups can easily be updated or reversed. Also, if the horizon is updated after the 'Active' property has been generated, the clean-up settings can simply be re-applied to re-generate the property for the updated horizon.
It is recommended to always perform the Horizon Clean-up step and make data points close to the faults 'inactive' so that horizon surfaces are constructed properly around faults. This can be achieved by distance to faults setting as low as 5 m. This reduces the risk of getting unwanted artifacts in the constructed surfaces of the structural model.
How the clean-up properties work
The most important 'clean-up' property is the property 'Active_<name of the fault model>' (called 'Active' hereafter), which contains regions around faults where data points are set to 'inactive', meaning that these data points will be ignored during surface construction with the Construct Surfaces step of the Structural Modeling workflow. You create these regions by entering a distance from fault on the Horizon Clean-Up form, per horizon-fault combination. All data points that fall within this distance are set to 'inactive' (see Image B below). The distance is applied onmi-directionally. Each horizon-fault combination can receive it's own distance to fault, with different values available for the footwall and hanging wall side of each fault. One 'Active' property is generated per horizon.

As a second step, and only in case you need to apply local variations to the 'Active' property (for example when the distance to fault does not apply to the full length of the fault) you can optionally generate a second property called 'Active_ManualEdits_<name of the fault model>' (called 'Active_ManualEdits' hereafter). You generate this property with the Horizon Clean-Up form as well, and once generated, you use the graphical Editing Tools > Property Tools to manually draw regions of 'active' and 'inactive' data points on the (horizon) surface (see Image C below). When you have finished editing this property, you integrate this property with the 'Active' property where the manual edits are predominating (i.e. the 'active'/'inactive' data points of the 'Active' property will be overwritten by the 'active'/'inactive' data points of the 'Active_ManualEdits' property, see Image D below). As such, the 'Active' property holds the final result, which will be used during surface construction.
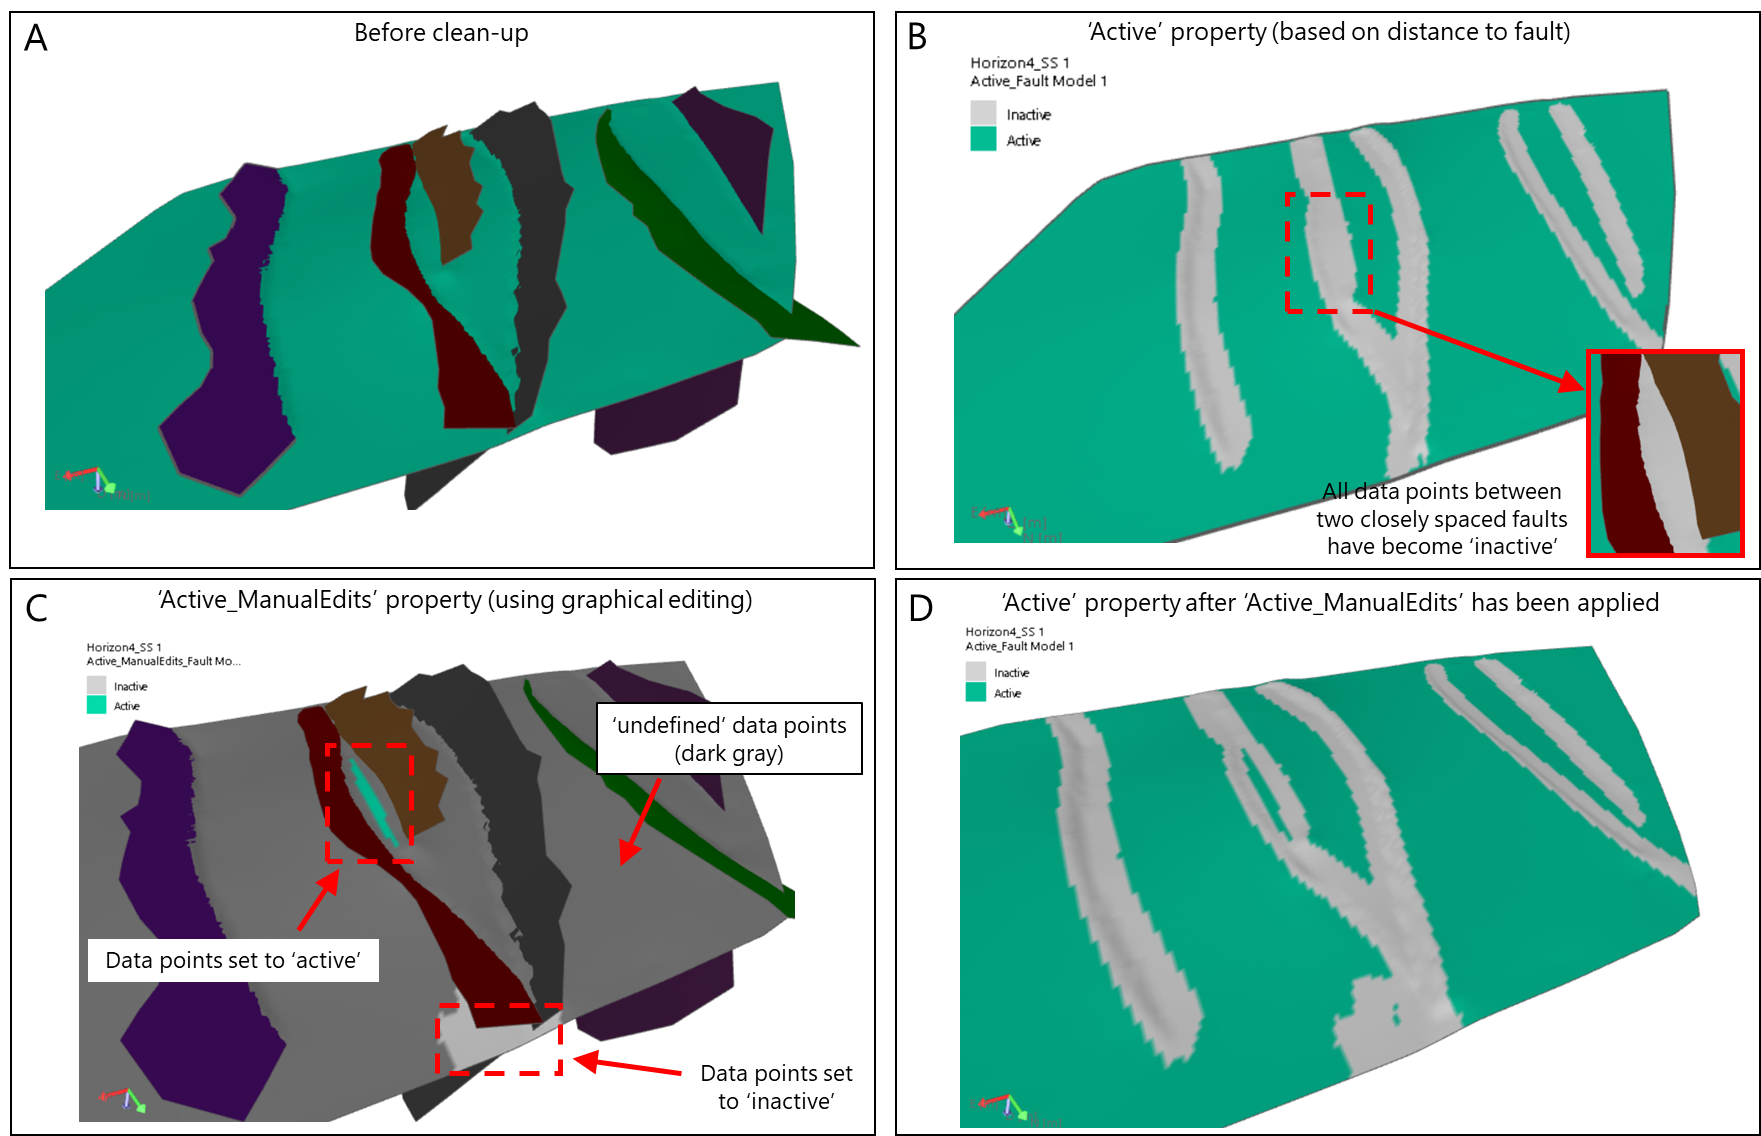
Horizon clean-up in steps. Image A: the horizon before clean-up. Image B: distances to fault determine 'inactive' data points around faults in property 'Active'. Image C: by making use of the Property Tool, some areas are set to 'active' (light green, i.e. color of the horizon) and 'inactive' (light gray); all other nodes remain 'undefined' (dark gray). Image D: the property 'Active_ManualEdits' has been applied to the 'Active' property, locally overwriting the 'Active' property with the 'Active_ManualEdits' property (compare with Image B). click to enlarge
The 'Active' and 'Active_ManualEdits' properties (in short, the 'clean up properties') are stored as properties of the input (horizon) surface in the JewelExplorer, with a reference to the name of the used fault model, for example 'Active_Fault Model 1' and 'Active_ManualEdits_Fault Model 1'.
Flexible use of clean-up properties
The horizon clean up properties 'Active' and 'Active_ManualEdits' are unique per 'Input source - Fault Model' combination. This has the following advantages:
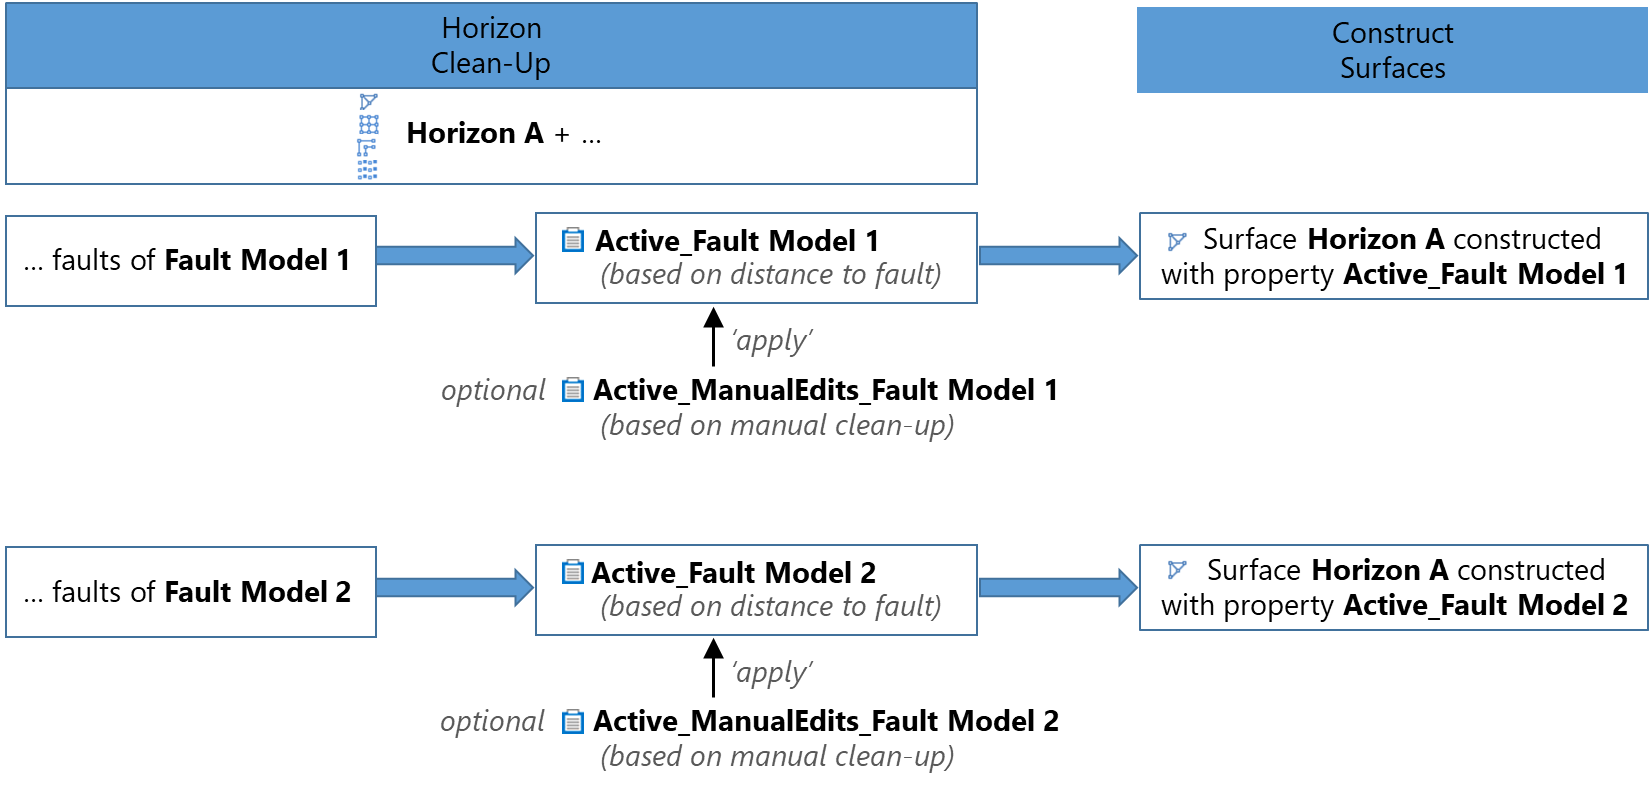
- The same horizon can be cleaned with different fault models. With each clean-up action, a new clean-up property 'Active' (and optionally 'Active_ManualEdits'), carrying the name of the fault model, is added as a property of the horizon in the JewelExplorer. This way, multiple structural models can be generated with the same horizon, each with its own clean-up settings (see diagram below).
- An input (horizon) is cleaned once per fault model and can then be used in multiple structural models, as long as the same input (horizon) source (i.e. surface set/seismic interpretation) and fault model are used. In case the horizon exists in another source (i.e. surface set/seismic interpretation), it needs its own 'Active' property. You can derive the previously used clean-up settings (see Derive Parameters below) to generate the 'Active' property based on those same settings.
To perform the clean-up
An overview of buttons and options of the Horizon Clean-Up form is given further below, under Rules and controls of the Horizon Clean-Up form.
-
- If you are opening the form from the Model > Structural Modeling workflow, select the structural model at the top of the form.
- If you are opening the form from the tools section of the Model > Faults strip, select the Source with the horizon which you want to clean up, and the Fault Model that contains the faults to use for cleaning up the horizon.
- After you have made your selection under step 1, the left table Select to Clean-Up shows all horizons that are present in your horizon input source (i.e. surface set/seismic interpretation), irrespective of their representation (tri-mesh, 2D grid, polyline set, point set).
- When you open the form for the first time, all horizons in the left table are unchecked by default and the right side of the table is empty.
- If the form has been applied previously (once or multiple times), all surfaces for which settings have been applied are selected in the left table (and the associated horizon-fault combinations are shown in the right table).
- Select one or more horizons to clean up in the left table by checking the checkbox. Upon selection, the right table fills with all intersecting faults for the selected horizon(s). It contains the following information:
Horizon Name of the horizon which has been selected in the left table.
Fault Name of the fault.
Length Length of the fault.
Hanging Wall Distance Distance over which data points will be set to 'inactive' in property 'Active' for the hanging wall side of the fault (default 25 m).
Footwall Distance Distance over which data points will be set to 'inactive' in property 'Active' for the footwall side of the fault (default 25 m).
Status Optional column to indicate the status of your work (choose from 'To do', 'In progress' and 'Done'. 'Derived' is set automatically when the 'Derive Parameters' functionality is used).
- (Optional) Select a horizon-fault combination in the right table, and click the Open View
 button at the top-right side of the table. The dedicated Horizon Clean-Up 3D View automatically opens, showing the selected horizon-fault combination with the distances from fault visualized as 'Inactive' data points (initially set to 25 m).
 - Switch on the legend in the dedicated Horizon Clean-Up 3D View to distinguish between 'active' and 'inactive' data points (right-mouse click on the horizon in the view to open the context menu and choose Show Legend).
- The selection of multiple horizon-fault combinations is supported (hold down Ctrl while making multiple selections in the table).
- When you enter clean-up distances in the table, the Horizon Clean-Up 3D View updates automatically to preview the impact.
- Specify clean-up distances in the Hanging Wall Distance and Footwall Distance columns. This is the distance on either side of the fault that for which data points will be set to 'inactive' and will be ignored during (horizon) surface construction with the Construct Surfaces step of the workflow. You can choose to specify the clean-up distance on an intersection-by-intersection basis or apply a global distance to all intersections:
- To specify the clean-up distance for each intersection, click into the Hanging Wall Distance and Footwall Distance columns for the intersections of interest and specify the distances.
- To specify a distance to apply to all intersections (note: only all intersections of surfaces selected in the left table), right-click in the table and select Set hanging wall distance globally or Set footwall distance globally. This opens the Set Global Value dialog; type the distance into the dialog and click OK. When finished, the value you specified will appear for all intersections in the Hanging Wall Distance or Footwall Distance column.
If you want to maintain all input data points for a particular horizon-fault combination, you can set the distance to fault to 0. Note that a zero clean-up at one side of the fault can still mean some data points are cleaned if the other side of the fault is not set to zero as well (due to data processing techniques). This generally has no significant impact on the constructed surface though. -
Click Apply or OK at the base of the form. This generates or updates the 'Active' property for each horizon that is selected in the table on the left of the form.
The 'Active' property is stored as a property of the input (horizon) surface in the JewelExplorer. If the source for the horizons in the structural model is a surface set, the 'Active' property can be found in Surface Sets > Surface Set Name > Horizons > Horizon Name > Representation Name. If the source for the horizons in the structural model is a seismic interpretation, the 'Active' property can be found in Seismic Surveys > Seismic Interpretation Name > Horizons > Horizon Name > Representation Name. - After you have QC'd the results you can continue adjusting the values in the Hanging Wall Distance and Footwall Distance columns and apply the operation again until you have reached the desired result.
- In the left table on the form, under Select to Clean-Up, select the horizon for which you want to generate the 'Active_ManualEdits' property (you can select multiple horizons at the same time).
- Click the
 Create property 'Active_ManualEdits' at the top-right of the left table and click Yes to the question whether to create the property. The property 'Active_ManualEdits' is created as a property of the input horizon in the JewelExplorer, next to the 'Active' property (see step 6 above where to find it). Note, if you have multiple representations under the same horizon (e.g. a tri-mesh and a 2D grid), the property is created for all representations. A green checkmark will appear in the Edit column to indicate the 'Active_ManualEdits' property has been created for at least one representation of that horizon.
 - Visualize the 'Active_ManualEdits' property in the 3D View and the intersecting fault(s) around which you want to apply manual edits. Initially all data points of the 'Active_ManualEdits' property are set to 'undefined'. Switch on the legend to verify this (to do this, right-mouse click on the property in the 3D View and choose Show Legend).
- Select (click on it) your horizon surface representation in the JewelExplorer and then click Workspace > Tools > Editing Tools (upper-right corner of the application). This opens the floating palette with the Property Tools section available for use.
- The Property Tools section contains various tools (pencil, color picker, line, etc.). Select the tool of your choice. This opens an extra section on the floating palette called 'Settings'. In the drop-down under 'Settings', select the property of your choice (i.e. 'active' or 'inactive') and start editing the surface (for more on how to use the property tools, see Property Tools).
- Once you are finished with setting 'active' and 'inactive' data points on the 'Active_ManualEdits' property, close the floating palette and revert to the Horizon Clean-Up form. In the lower-left corner of the form, check the Apply manual edits checkbox.
- Select the horizon(s) for which you finished drawing the 'Active_ManualEdits' property and click Apply at the base of the form. This will apply the 'Active_ManualEdits' property to the 'Active' property, which means the 'active'/'inactive' data points of the 'Active' property will be overwritten with the (manually edited) 'active'/'inactive' data points of the 'Active_ManualEdits' property. The 'Active' property is now ready to be used during horizon (surface) construction.
Generating property 'Active' using distances to fault
Generating property 'Active_ManualEdits' using graphical editing
Rules and controls for the Horizon Clean-Up form
- The table on the form always remembers the settings for a horizon-fault combination which were last applied.
- When you update the settings for a horizon-fault combination, you have to click Apply at the base of the form to update the ‘Active’ property (the property is used during Construct Surfaces, not the settings).
- Apply at the base of the form only updates the 'Active' property for selected horizons (checkbox checked) in the left table. Not having a horizon checkbox checked will not remove previously applied settings for that horizon.
- In case multiple representations exist for a horizon (e.g. tri-mesh and 2D grid), the properties 'Active' and 'Active_ManualEdits' will be generated for each representation.
- Updates to the 'Active' property with the table on the right side of the form will update the 'Active' property for each representation in the JewelExplorer.
- Edits to the 'Active_ManualEdits' property (which you do graphically) are limited to the representation for which you made the edits.
- With the
 Reset button (located above the left table) you can remove any existing 'Active' (and optionally the 'Active_ManualEdits') property for the selected horizon and reset the table settings to default values.
- If you then click Apply at the base of the form again, an 'Active' property is generated based on these default settings.
- If you leave the form without clicking Apply, no 'Active' property exists for the horizon and the (horizon) surfaces will be constructed without any clean-up settings, leading to potential construction issues around faults.
- A green checkmark in Edit reflects whether the 'Active_ManualEdits' property exists for at least one representation of the (horizon) surface; it does not reflect whether any meaningful edits have been made on this property (all its data points are initially set to 'undefined').
-
 Derive Parameters derives the table settings for recognized horizon-fault combination in the selected ‘source’, not the 'Active' property itself. Click Apply to generate the 'Active' property based on those settings. (Deriving is based on name recognition for the horizon and fault in the selected source.)
 - Clicking the Create property 'Active_ManualEdits' button (located above the left table) creates the property 'Active_ManualEdits' for the selected horizons (checkbox checked) in the left table. You find the property under the horizon in the JewelExplorer. After creation, use the Editing Tools > Property Tools to 'manually' draw regions of 'active' and 'inactive' data points on the (horizon) surface.
- With the Apply manual edits checkbox at the lower-left bottom of the form checked, the 'Active_ManualEdits' will be combined/integrated with the 'Active' property for the selected horizons when Apply is clicked at the base of the form.
- If you would uncheck the box, and click Apply at the base of the form again, the manual edits will be removed from the 'Active' property again.